

Setting up an IP phone system on Linux does not need to start with manually editing the dialplan. The FreePBX 17 provides a web interface to manage Asterisk: extensions, trunks, routes, queues, and auto-attendant are organized into modules. The important change in this generation is in the foundation: Debian 12, installation via script or ISO, and attention to migrating from chan_sip to PJSIP.
In this guide, we will separate the versions involved, choose the installation method, and set up a lab with two extensions. Then, we will look at what changes when migrating an existing PBX and the precautions before connecting to a carrier. The references are the official Sangoma documentation, the installer maintained by the project, and the two videos indicated at the end.
FreePBX does not replace Asterisk
Think of two layers: Asterisk runs the telephony; FreePBX provides the panel that organizes your configuration. The first processes calls and dialplan applications. The second lets you manage the PBX without writing every configuration by hand. This is the relationship that the official installer repository describes.
There is also a difference between open-source software and a telephone service: installing FreePBX does not provide you with a public number or free external calls. Two local extensions can talk to each other without a carrier; to reach the public telephone network, you will need an appropriate service, such as a hired SIP trunk.
The ecosystem combines open components with optional commercial modules. So, confirm the license of the desired feature before assuming that a function shown in a demo is included in the basic install.
What changes in FreePBX 17
- Officially supported base: Debian 12 Bookworm. Don't use Debian 13 or Ubuntu as automatic substitutes for this procedure.
- PHP 8.2: is the version used in this generation; don't swap the PHP stack on your own in a production PBX.
- Open Bash installer: can be run on a fresh Debian 12, physical or virtual.
- Available ISO: automates the Debian installation and the execution of this same installer, instead of constituting a completely independent path.
- Asterisk 22 by default currently: release examples may show Asterisk 21, but they don't necessarily represent a fresh installation.
These points are listed on the official FreePBX 17 page. The final version, or GA, was made available at 2 August 2024. The current installer code confirms Asterisk 22 and PHP 8.2 as defaults and rejects non-Bookworm systems.
Architecture: panel, extensions, and carrier
In the lab, two SIP clients register their extensions on Asterisk. The administrator configures the PBX through FreePBX. The trunk with a carrier is a later step: it is not required for the first internal call.
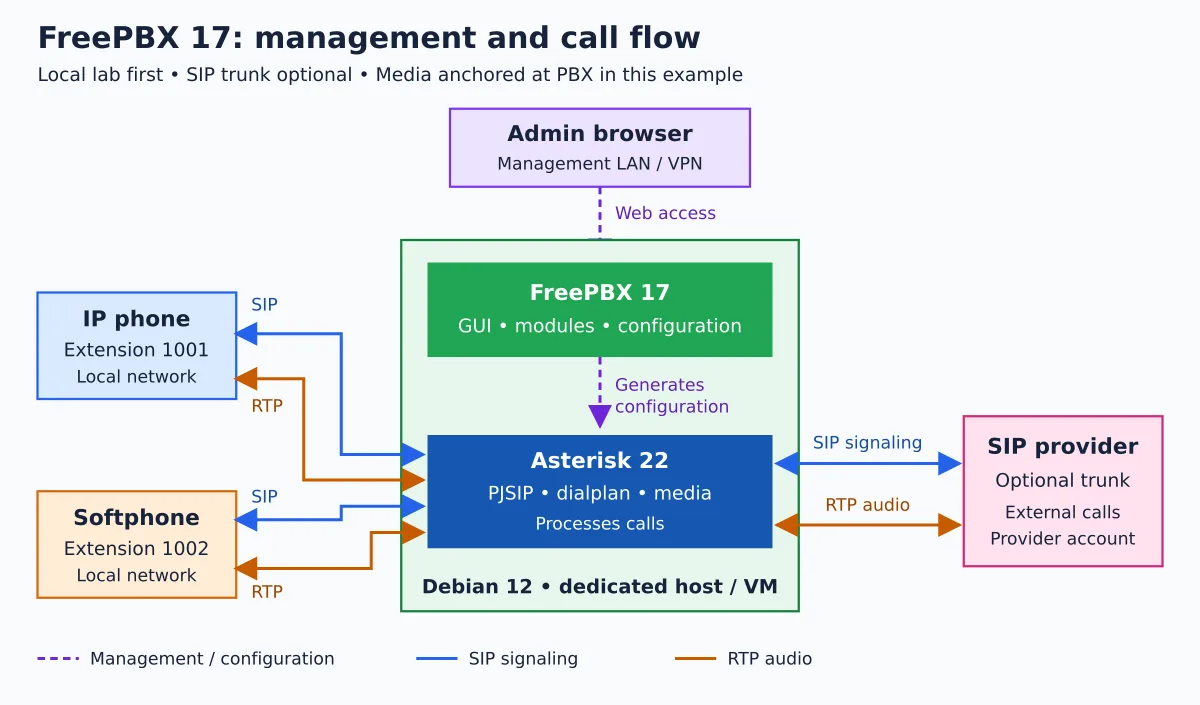
Signaling is not audio. SIP negotiates the call; RTP carries the media. Thus, an extension can register and make the other one ring, but still have no audio if the network is incorrect. The diagram represents media passing through the PBX; direct media settings can change that path.
Going to virtualize? See also the history of Proxmox and the history of VirtualBox. To understand the distribution that underpins the PBX, it's worth reading the history of Ian Murdock and Debian.
Prepare a separate lab
A official downloads page specifies the minimum of 2 GB of RAM and 20 GB of disk for the Debian host or VM 12. This is not a production sizing: simultaneous calls, transcoding, and recordings change the resource requirement.
As a starting point for this small lab, I suggest 2 vCPUs, 4 GB of RAM and 40 GB of disk. It is a lab choice, not a capacity guarantee or an official requirement. Use a dedicated VM, a stable IP address or DHCP reservation, working DNS, and internet access to download the packages.
Leave the VM and both clients on a lab network that allows communication between them. On networks isolated by the hypervisor's NAT, verify connectivity before investigating SIP. Do not place the PBX directly on the internet to simplify the test.
Option 1: install with the official script
Use this path on a freshly installed, dedicated Debian 12. The installer sets up dependencies and repositories: do not run it on the server that already hosts your website, database, or other PBX. Open an administrative session on the VM; the commands below are for it, not for your workstation. If you use SSH, prepare a persistent session with tmux before starting the installation.
# Na VM Debian 12, abra uma sessão root
sudo -i

# Confira o sistema e a conectividade local
cat /etc/os-release
ip -br address
ip route

# Instale o utilitário de download, se necessário
apt-get update
apt-get install -y wget ca-certificates less tmux

# Abra a sessão persistente antes da instalação
tmux new -s freepbx
Inside the tmux, execute the following block. If the SSH connection drops, log back into the VM, open the root session, and resume with tmux attach -t freepbx.
# Baixe o instalador oficial, sem executá-lo diretamente do download
wget -O /tmp/sng_freepbx_debian_install.sh \
  https://github.com/FreePBX/sng_freepbx_debian_install/raw/master/sng_freepbx_debian_install.sh

# Leia o script; pressione q para sair
less /tmp/sng_freepbx_debian_install.sh

# Depois da revisão, execute a instalação
bash /tmp/sng_freepbx_debian_install.sh
If your minimal installation does not have sudo or less, use the administrative access configured during the Debian installation and install the necessary utilities. The official README documents the download and execution as root. Do not add --testing for a normal installation.
If the installer indicates that a newer version exists, download the file again instead of bypassing the check with --skipversion. In another administrative terminal, monitor the most recent file created in /var/log/pbx/:
ls -lt /var/log/pbx/freepbx17-install*.log
# Use o nome exato listado acima:
# tail -f /var/log/pbx/freepbx17-install-DATA-HORA.log
A installation documentation explains the options. --opensourceonly selects only open FreePBX modules; --dahdi is relevant for compatible telephony hardware. Do not add DAHDI in a purely SIP lab without need: the drivers have specific kernel dependencies.
Option 2: install via ISO
Prefer to boot a VM from a ready-made media? Get the current link and the SHA-256 at download page, verify the integrity of the image and follow the official ISO guide v17. The installation still depends on the network to download components.
Set the VM firmware to UEFI. The ISO menu offers installation profiles, called spice levels. For a SIP-only lab, without physical telephony cards, the guide suggests Basic → FOG.
# No diretório onde você salvou a ISO:
sha256sum SNGDEB-PBX17-*.iso
# Compare o resultado com o SHA-256 da mesma imagem no site oficial.
The ISO directory also contains historical images. Being available for download does not mean it is still supported. To get started, follow the file indicated on the current page, not an old ISO chosen by name.
ISO v17 disables the root login by default. Depending on the profile, the installation may display a generated password for the user sangoma: if this screen appears, save the password. Follow the guide to set or change the credentials and use sudo for administrative tasks. It is not necessary to resort to GRUB password recovery just because the root login is not available.
First access and two PJSIP extensions
Once the installation is complete, open the VM's IP address in the browser on the lab network. Create the administrative credentials and configure secure access. In production, use HTTPS with a valid certificate and restrict administration to the management network or VPN.
- In Applications → Extensions, choose to add an extension PJSIP.
- Create the extension 1001, with an identification name. Keep the generated Secret or use another equally strong and unique one. Do not use the number itself as a password.
- Repeat the procedure for the extension 1002, with another password.
- Save and apply the changes with Apply Config.
- Configure a SIP client for each extension: server/domain = VM IP; password = the matching Secret. Use the extension number as the username in the default configuration; if there is custom authentication, check the user defined in the PBX. Also verify the port and transport.
- With both registered, call from 1001 to 1002 and then in the opposite direction. Check the audio on both sides.
The extension, caller ID, and password fields are described in the PJSIP extensions guide. Some screenshots from the wiki belong to earlier versions; follow the PJSIP type, not old tutorials that choose chan_sip.
For a first check from the PBX terminal:
sudo asterisk -rx 'core show version'
sudo asterisk -rx 'pjsip show endpoints'
sudo asterisk -rx 'pjsip show contacts'
If you are already root and do not have sudo, skip that prefix. These commands help check the installed Asterisk, the endpoints, and their contacts. The functional proof is still the call being completed with bidirectional audio, not just the presence of the extension in the list.
Softphones for Debian and Ubuntu
The MicroSIP shown in the video is an option for Windows. To participate in the same lab from a Linux desktop, you can use one of the SIP clients below. The client runs on the user's workstation, not on the FreePBX server.
| Client | Profile | How to get |
|---|---|---|
| Linphone | Open softphone for audio and video over SIP. | Official download, with AppImage for Linux, or a package linphone-desktop from the distribution when available. |
| Twinkle | SIP voice telephony-focused alternative, with transfer and conference. | Package twinkle; check the catalog of Debian 12 or verify availability on your Ubuntu workstation 24.04 with apt-cache policy twinkle. |
| Blink | SIP client with additional communication features. | The official site points Debian and Ubuntu to the AG Projects repository. Check the support for your version before adding it. |
| GOnnect | VoIP client integrated with the desktop, with file-based provisioning and integration with compatible contacts and headsets. | GONICUS Project distributed for Linux via Flathub. |
To get started, I would choose the Linphone available in the station's own repository. The package is documented in Debian 12 and is available in Ubuntu 24.04; in Ubuntu, it belongs to the Universe component. This does not mean that it will be available in every version of Debian or Ubuntu. Check the candidate before installing:
# Na estação gráfica Debian/Ubuntu, não no servidor PBX
sudo apt-get update
apt-cache policy linphone-desktop twinkle

# Escolha um cliente com candidato disponível:
sudo apt-get install linphone-desktop
# Alternativa, em vez do Linphone:
# sudo apt-get install twinkle
Do not install an .deb of Ubuntu on Debian, nor from another version of the distribution for convenience: the required libraries may be different. The distribution's package may also have an earlier version than the one provided directly by the project.
GOnnect deserves a note: the project was designed for provisioning by file, rather than a wizard to register the SIP account. With Flatpak and the Flathub repository already configured on the station, the installation can be done as follows:
flatpak install flathub de.gonicus.gonnectThen, adapt the official example file to your extension's credentials and transport and save it in ~/.var/app/de.gonicus.gonnect/config/gonnect/99-user.conf, as per the README. See the GOnnect guidelines before starting and protect the file because it contains credentials. It is not enough to install the application and look for a screen to register the SIP account. Desktop and hardware integrations depend on the environment and the supported devices.
# Crie o diretório antes de salvar a configuração adaptada
mkdir -p ~/.var/app/de.gonicus.gonnect/config/gonnect
# Depois de salvar 99-user.conf com suas credenciais:
chmod 600 ~/.var/app/de.gonicus.gonnect/config/gonnect/99-user.conf
flatpak run de.gonicus.gonnect
Update (11/10/2026) — experimental AppImage: we contributed the PR #764 to build GOnnect as an AppImage for Ubuntu 24.04 x86_64. The proposal is still open: it is not an official release nor does it provide a downloadable binary in the PR. Flatpak remains the official distribution indicated above.
In local testing with the initial AppImage build on Ubuntu 24.04 with KDE/X11 and an EKSA headset, we confirmed a call with two-way audio after selecting the correct devices in GOnnect and using QT_AUDIO_BACKEND=pulseaudio. The tweak selects the PulseAudio interface only for the application, without changing the system default audio. Afterwards, the same pattern was incorporated into the rebuilt AppImage, which passed startup and shutdown tests, but has not yet had a new manual call validated.
It is a result specific to this environment, not a guarantee for other desktops or headsets nor a definitive diagnosis of a failure in Qt/PipeWire. Refer to the PR for requirements, limitations, and build instructions; SIP credentials and personal settings are not part of the contribution.
If you need the binary distributed by Linphone itself, the official Linux release reference consulted for this article points to Linphone 6.2.3 in AppImage x86_64. It is an alternative to the native package, not a guarantee of compatibility with any system: check the architecture and version requirements. The indicated GitHub contains the source code; the official binaries are on the project's downloads domain.
To access your extensions, configure the SIP account of your FreePBX in the client: central address, extension number, authentication user and Secret defined previously. There is no need to create an account on the manufacturer's public service to make internal calls between 1001 and 1002.
Network with problematic IPv6? To test HTTP access over IPv4, use curl -4 -I https://github.com/belledonnecommunications/linphone-desktop. In APT, the option Acquire::ForceIPv4 forces downloads over IPv4, without disabling IPv6 on the system:
sudo apt-get -o Acquire::ForceIPv4=true update
sudo apt-get -o Acquire::ForceIPv4=true install linphone-desktop
Forcing IPv4 alone does not fix a DNS resolver failure. Distinguish a name resolution error, a connection failure, and a SIP authentication error before changing the network or firewall.
Firewall and NAT: do not solve it by turning off protection
The SR TECH LAB lab video includes shortcuts to a learning environment. Do not adopt disabling the firewall as a final configuration. In Connectivity → Firewall, register the required hosts and networks, check the zones and preserve an administrative path before applying changes. The official guide warns that leaving an entire interface in the Trusted zone is an incorrect configuration.
The guide informs that new interfaces are added to Trusted by default. Before changing the interface's zone, register the laboratory network in Networks, in the appropriate Local or Internal zone, and the admin host/network with the necessary permissions. The External zone does not allow SIP by default; moving the interface without preparing these rules can disrupt registrations.
For audio problems, review Settings → Asterisk SIP Settings: local networks, external address when applicable, codecs, and the RTP range. The module documentation reports 10000–20000/UDP as the default RTP range; confirm the actual value on your PBX. The SIP port depends on the transport and configuration adopted.
- Does not register: check address, user, password, transport, and firewall rules.
- It rings, but there is no audio: investigate RTP, NAT, codecs, and advertised addresses.
- Only one side hears: check the media path in both directions, including the client firewall.
Do not create public forwards for a test between local machines. For remote extensions, consider a VPN. The FreePBX firewall handles configured trunks automatically, according to the guide; this does not eliminate the need to review the edge firewall, NAT, and cloud rules, allowing only the necessary flows and sources. If using TLS and SRTP, confirm support and configuration on all participants: enabling HTTPS in the panel does not automatically encrypt calls.
From internal call to SIP trunk
After the local test, a PBX connected to the public telephone network needs three elements: trunk, outbound route and inbound route. The trunk describes the connection to the carrier; the outbound route defines which numbers will use that connection; the inbound route forwards received calls to an extension, group, queue, or IVR.
Use the parameters provided by the carrier: authentication or IP identification, server, transport, codecs, numbering format, and caller ID. Do not copy addresses and credentials from an example of another provider. Restrict allowed destinations and test real calls before releasing use to users. The PBX configuration guide is a starting point for navigating the modules.
Migrating from the old FreePBX requires a new installation
The documented path for leaving previous versions is Backup & Restore on a fresh FreePBX 17. There is no direct in-place update from those versions to the 17. This guidance is in the official migration guide.
- Inventory extensions, trunks, routes, recordings, certificates, commercial modules, and customizations.
- Generate the backup using the appropriate module and keep a copy off the PBX.
- Install FreePBX 17 on another VM. Before restoring, isolate the lab to prevent concurrent registrations on the carrier and unwanted calls.
- Restore the backup and review the conversion of chan_sip extensions and trunks to PJSIP.
- Revise dialplans and custom scripts, including AGI, that use
Macro(); with Asterisk 22, they require adaptation toGosub(). - Validate the call flows and plan the swap with a maintenance window and rollback procedure.
PJSIP is not a new protocol that the carrier needs to invent. It is the SIP stack/driver used by Asterisk. The Asterisk documentation confirms the removal of chan_sip starting with Asterisk 21. Phones continue to speak SIP, but parameters and behaviors need to be checked during the migration. A completed backup is not the same as an approved restore — the same distinction discussed in the article about backup with tested restore.
The documentation describes the version swap with asterisk-version-switch for legacy transitions, but does not recommend staying on chan_sip. Do not choose an older version without checking its support. For this guide, the target is the default Asterisk 22, with PJSIP and the adapted customizations.
Support: FreePBX, operating system, and Asterisk
A official version matrix lists FreePBX 17 as supported and points to 30 of June 2028 as expected EOL. This is the situation consulted for this article, not an immutable promise.
Do not conclude that an old FreePBX is safe just because its modules still receive some maintenance: the matrix distinguishes application support from the SNG7 system, already discontinued. It also presents future versions as planned. Planning is not an available release. Before deploying or migrating, check the matrix and dependency cycles again.
Do not update the base of a FreePBX 17 PBX from Debian 12 to Debian 13: this combination is not officially supported. Package updates within Bookworm and migration to another distribution version are different operations.
Videos: practical installation and migration
Video complement — SR TECH LAB: FreePBX 17 Complete Installation in VMware | PJSIP Extensions & First VoIP Call, published on 12 August 2026. It demonstrates a VM, two PJSIP extensions and the first call with MicroSIP. It is a lab, not a security model for production.
Official webinar — Sangoma: FreePBX 17 Hands-on: Installing & Migrating, published on 27 June 2024. It explains installation, PJSIP, switching from Macro to Gosub, and migration by backup and restore. The video predates the August 2024 GA; versions, screens, and feature availability must be cross-checked with current documentation.
Checklist before going to production
- Debian and modules updated through supported paths, with a backup taken prior to changes.
- Administrative access restricted, HTTPS and unique passwords for the panel and extensions.
- Active firewall, reviewed zones, and no entire interface set to Trusted for convenience.
- Inbound, outbound and internal calls tested with bidirectional audio, transfer and pickup.
- Routes limited to the necessary destinations, with alerts and consumption limits on the carrier when available.
- Backups protected outside the PBX, rehearsed restore procedure, and retention policy for recordings.
- Monitoring of disk, availability, certificates and registration failures.
The first goal is simple: two extensions talking with active protection. The jump to production comes afterwards, with trunks, routes, security and recovery tested. FreePBX makes telephony administration easier; it does not eliminate the responsibility of operating the PBX.