
Needing an S3-compatible API does not mean needing to host the data on AWS. The RustFS is an object storage server written in Rust: it receives requests from applications and S3 clients, stores objects on disks under your control, and offers an administration console. In this guide, we will install via binary with systemd or Docker with Compose, secure the credentials, and validate the full path: create a bucket, upload, download, and check a file.
Review reference: October 7, 2026. The examples pin RustFS 1.0.1, stable release from October 3, 2026. This is not a promise of a permanent “latest version.” Check the release notes before installing or upgrading.
What RustFS is — and what it isn't
Despite the name, it is not a file system for formatting a partition and mounting in place of ext4 or XFS. The main interface in this article is an object API: each object has content, a key, and metadata and belongs to a bucket. A name like backups/servidor1/arquivo.tar is a key with prefixes; it does not, by itself, create the same operations and guarantees as a POSIX directory.
It is useful for applications that already speak S3, development environments, artifact repositories, analytical data storage, and compatible backup destinations. Do not swap a shared folder or a database disk for a bucket without verifying the access model required by the application.
The server code uses the Apache 2.0 license. Self-hosting means that capacity, update, access, monitoring, and recovery are the operator's responsibility. The Rust language is a trait of the implementation, not a guarantee of invulnerability or performance on your hardware.
S3 compatibility: test the application, not just the logo
“S3-compatible” does not equate to reproducing all AWS services and behaviors. Check the compatibility matrix and validate the operations your application actually uses: multipart upload, signed URLs, metadata, checksums, versioning, policies, and deletion.
The repository presents features such as versioning, Object Lock, lifecycle, replication, IAM, and encryption. The availability of a feature does not automatically configure a secure policy: each one needs scope, credentials, and failure testing. Features marked as preview should not be treated as a production contract. See the project's feature table.
Attention to MinIO: API compatibility and on-disk format compatibility are different matters. The README consulted still classifies on-disk interoperability as preview, conditioned on a feature rio-v2, outside the default build, and reports limitations with objects encrypted by MinIO. Do not point RustFS at the only production disks of MinIO as if you were just swapping the executable.
Architecture: API, console, and persistence
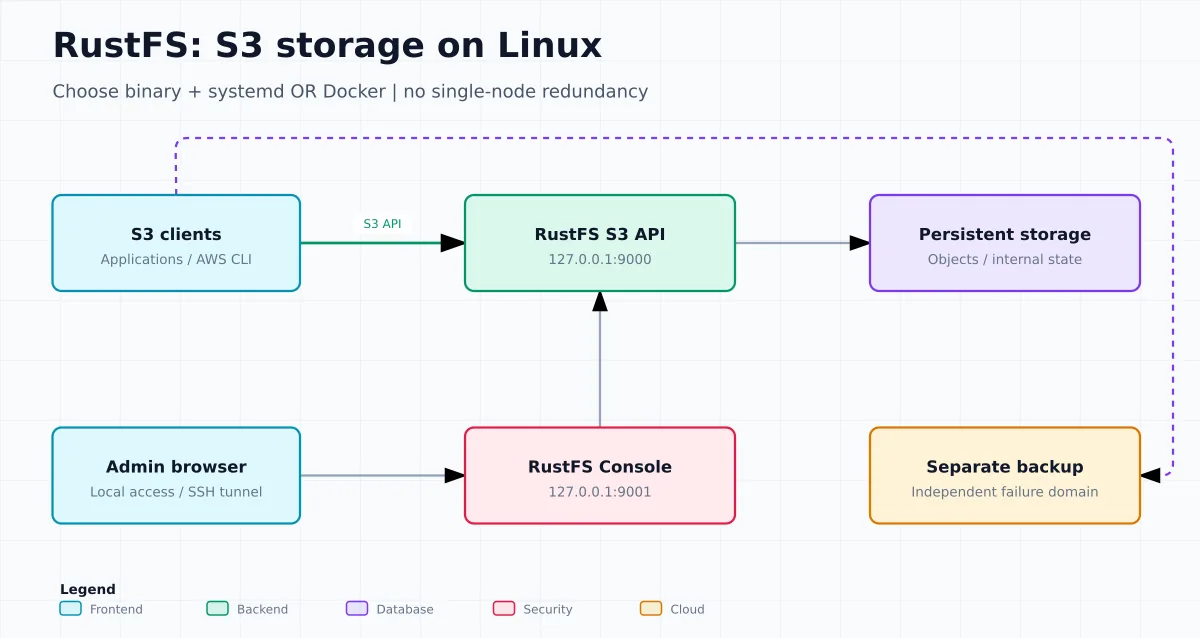
In the examples, the S3 API runs on 127.0.0.1:9000 and the console runs on 127.0.0.1:9001. Applications use the API; administrators use the console. Storage must survive replacement of the executable or container. The backup must be in a different failure domain, not in another folder on the same disk.
| Topology | How it works | Main limitation |
|---|---|---|
| SNSD | Single node, single disk/local path. | No redundancy across disks; storage failure requires recovery. |
| SNMD | Single node, multiple disks, with erasure coding. | The machine remains a single point of failure. |
| MNMD | Multiple nodes and disks, with data distribution. | Requires planning of quorum, network, failure domains, and operation. |
This tutorial stays in SNSD. Creating multiple folders on the same disk does not create physical redundancy. The project also warns that SNSD does not grow directly into a multi-disk pool: plan another deployment and migration through the S3 API. Consult the topology selection and the warning about expansion.
Before installing
- Use an Ubuntu or Debian test host with systemd, sudo, Bash, and x86_64 or ARM64 architecture.
- Reserve persistent storage and space for objects, old versions, and logs.
- Check clock synchronization: signed authentication depends on correct time.
- Keep the firewall active. At this first stage, do not open 9000/9001 to the internet.
- Choose a of the paths. Do not run binary and Docker on the same ports or with the same data directory.
The official guide recommends XFS and disks presented individually to the system for your storage deployments; NFS is not recommended as a backend. The local folder used here simplifies the lab and does not represent a production layout. There is no formatting command in this article: identifying the wrong disk can destroy data. For hardware and cluster, follow the official prerequisites.
uname -m
timedatectl status
df -hT
sudo ss -lntp | grep -E ':(9000|9001)\b' || true
sudo apt update
sudo apt install -y ca-certificates curl unzip openssl
Option A: install from the official binary
1. Download a fixed version and validate the SHA-256
The block below selects the musl package from the release 1.0.1 for x86_64 or ARM64. The SHA-256 were verified against the official artifacts of that release. When changing the version, also update name, URL, and hash; do not remove the validation.
Run the entire block in Bash. It works in an exclusive temp folder and installs the versioned binary only if the checksum matches.
(
set -euo pipefail
VERSION=1.0.1
case "$(uname -m)" in
  x86_64)
    ARCH=x86_64
    SHA256=a834096dafa1f1a55825a2cdaf49d006a193978d344f2d508c2be475133738a3
    ;;
  aarch64|arm64)
    ARCH=aarch64
    SHA256=d2533e293204597416cb8d30790ea35df14cb4521633fa3574c64333141bafdf
    ;;
  *) echo "Arquitetura não coberta por esta receita"; exit 1 ;;
esac
WORK=$(mktemp -d)
trap 'rm -rf -- "$WORK"' EXIT
cd "$WORK"
FILE="rustfs-linux-${ARCH}-musl-v${VERSION}.zip"
curl --fail --location --retry 3 --output "$FILE" \
  "https://github.com/rustfs/rustfs/releases/download/${VERSION}/${FILE}"
printf '%s  %s\n' "$SHA256" "$FILE" | sha256sum --check -
unzip -q "$FILE" -d unpack
BIN=$(find unpack -type f -name rustfs -print)
test -n "$BIN" && test -f "$BIN"
sudo install -d -m 0755 /usr/local/lib/rustfs
sudo install -o root -g root -m 0755 "$BIN" \
  "/usr/local/lib/rustfs/rustfs-${VERSION}"
sudo ln -sfn "/usr/local/lib/rustfs/rustfs-${VERSION}" /usr/local/bin/rustfs
/usr/local/bin/rustfs --version
)
If the download, checksum, or executable location fails, the block stops. Do not compute a new hash from the downloaded file to “fix” the mismatch. Check architecture, release, and source. The executable remains under root's control; those who write objects do not need to be able to replace it.
2. Create user and directories
On a new host, create a dedicated account. If it already exists, inspect the previous installation instead of blindly repeating the recipe.
sudo adduser --system --group --home /var/lib/rustfs \
  --shell /usr/sbin/nologin rustfs
sudo install -d -o rustfs -g rustfs -m 0750 /var/lib/rustfs
sudo install -d -o rustfs -g rustfs -m 0750 /var/lib/rustfs/data
sudo install -d -o rustfs -g rustfs -m 0750 /var/log/rustfs
If the data is on a dedicated volume, mount it before creating the final directory, verify with findmnt and add a mount-point dependency to the unit. Otherwise, the service may write to the root disk if the mount fails. Do not run chown -R on a tree that contains data from other services.
3. Generate credentials without a default password
The documented names are RUSTFS_ACCESS_KEY and RUSTFS_SECRET_KEY. Do not confuse it with an AWS IAM account: these credentials belong to your RustFS. The default public value rustfsadmin must not be used. The access key below uses uppercase hexadecimal; it does not contain the slash that would break the SigV4 signing scope. Credential reference.
This command fails if the file already exists, to avoid silently overwriting keys from a previous installation:
sudo bash -euo pipefail <<'ROOT'
test ! -e /etc/default/rustfs
umask 077
{
  printf 'RUSTFS_ACCESS_KEY=%s\n' "$(openssl rand -hex 10 | tr 'a-f' 'A-F')"
  printf 'RUSTFS_SECRET_KEY=%s\n' "$(openssl rand -hex 32)"
  cat <<'ENV'
RUSTFS_ADDRESS=127.0.0.1:9000
RUSTFS_CONSOLE_ADDRESS=127.0.0.1:9001
RUSTFS_CONSOLE_ENABLE=true
RUSTFS_OBS_LOGGER_LEVEL=info
RUSTFS_OBS_LOG_DIRECTORY=/var/log/rustfs
ENV
} > /etc/default/rustfs
chmod 600 /etc/default/rustfs
ROOT
Open with sudoedit /etc/default/rustfs and store the credentials in the team vault. Do not publish the file or copy its output into tickets. In this unit, systemd reads the protected file and delivers the environment to the process; the service user does not need to read a root-only file directly.
4. Create the systemd service
The unit below is an adaptation for a single node, non-root user, and explicit directories. Type=simple indicates process start, not API readiness; readiness will be checked separately. For an introduction to units and logs, see our systemd guide.
sudo tee /etc/systemd/system/rustfs.service > /dev/null <<'EOF'
[Unit]
Description=RustFS Object Storage
Documentation=https://docs.rustfs.com/en/
Wants=network-online.target
After=network-online.target

[Service]
Type=simple
User=rustfs
Group=rustfs
WorkingDirectory=/var/lib/rustfs
EnvironmentFile=/etc/default/rustfs
ExecStart=/usr/local/bin/rustfs /var/lib/rustfs/data
Restart=on-failure
RestartSec=5
TimeoutStopSec=120
LimitNOFILE=1048576
UMask=0027
NoNewPrivileges=true
PrivateTmp=true
ProtectHome=true
ProtectSystem=full
StandardOutput=journal
StandardError=journal

[Install]
WantedBy=multi-user.target
EOF
sudo systemd-analyze verify /etc/systemd/system/rustfs.service
sudo systemctl daemon-reload
sudo systemctl enable --now rustfs
sudo systemctl status rustfs --no-pager
sudo journalctl -u rustfs -n 80 --no-pager
In addition to the journal, the configuration directs application logs to /var/log/rustfs; include that path in your log retention policy. If the unit restarts repeatedly, stop it and fix the error: automatic restart will not resolve a denied permission, busy port, or missing volume.
Option B: install with Docker and Compose
This is an alternate path, not a continuation of option A. Use an up-to-date Docker Engine and the Compose plugin. Confirm docker version and docker compose version; if they are missing, follow the official installation. The user needs access to the daemon, a privilege that should be treated as administrative.
The example fixes the tag rustfs/rustfs:1.0.1, persists data and logs in named volumes and publishes only on loopback. Inside the container, the process needs to listen on the internal interface, not on 127.0.0.1: what restricts access on the host is the port mapping.
1. Create the project and the credentials file
umask 077
PROJECT=$(mktemp -d "$HOME/rustfs-lab.XXXXXX")
cd "$PROJECT"
printf '%s\n' "Projeto criado em: $PROJECT"
{
  printf 'RUSTFS_ACCESS_KEY=%s\n' "$(openssl rand -hex 10 | tr 'a-f' 'A-F')"
  printf 'RUSTFS_SECRET_KEY=%s\n' "$(openssl rand -hex 32)"
} > rustfs.env
chmod 600 rustfs.env
printf '%s\n' 'rustfs.env' '.env' > .gitignore
Save this path: the Compose commands need to be run there. Open rustfs.env locally to create the credentials in the vault. Environment files are not encryption; users with access to the daemon can inspect the container's environment. In a more sensitive operation, consider injecting via files RUSTFS_ACCESS_KEY_FILE and RUSTFS_SECRET_KEY_FILE, with proper permissions.
2. Save the Compose
Create the file compose.yaml with this content:
name: linuxpro-rustfs-lab
services:
  rustfs:
    image: rustfs/rustfs:1.0.1
    restart: unless-stopped
    env_file:
      - ./rustfs.env
    environment:
      RUSTFS_ADDRESS: ":9000"
      RUSTFS_CONSOLE_ADDRESS: ":9001"
      RUSTFS_CONSOLE_ENABLE: "true"
      RUSTFS_OBS_LOGGER_LEVEL: "info"
      RUSTFS_OBS_LOG_DIRECTORY: "/logs"
    command: ["/data"]
    ports:
      - "127.0.0.1:9000:9000"
      - "127.0.0.1:9001:9001"
    volumes:
      - rustfs-data:/data
      - rustfs-logs:/logs
    security_opt:
      - no-new-privileges:true
    cap_drop:
      - ALL
    stop_grace_period: 2m
    healthcheck:
      test: ["CMD", "curl", "-fsS", "http://127.0.0.1:9000/health/ready"]
      interval: 30s
      timeout: 5s
      retries: 5
      start_period: 60s
    logging:
      driver: json-file
      options:
        max-size: "10m"
        max-file: "3"
volumes:
  rustfs-data:
  rustfs-logs:
The intervals, the Docker log limit, and the stop time are choices for this lab, not sizing guarantees. The rotation above limits Docker's stdout/stderr; it does not automatically limit files written to /logs. a different name if linuxpro-rustfs-lab already exists, to avoid accidentally reusing volumes.
3. Upload and check the image
docker compose config --quiet
docker compose pull
docker image inspect rustfs/rustfs:1.0.1 --format '{{index .RepoDigests 0}}'
docker compose up -d
docker compose ps
docker compose logs --tail=80 rustfs
Use config --quiet to validate without printing resolved credentials. Record the digest and, if you need to reproduce the deployment exactly, replace the image reference with the approved digest. An unhealthy healthcheck does not make Docker automatically restart a process that is still running: monitoring and a defined action are required.
The Version Dockerfile uses UID/GID 10001, creates the directories and includes curl. New named volumes inherit the image preparation; if you prefer bind mounts, prepare only the dedicated directories:
sudo install -d -o 10001 -g 10001 -m 0750 /srv/rustfs-lab/data
sudo install -d -o 10001 -g 10001 -m 0750 /srv/rustfs-lab/logs
In that case, replace the volume sources in Compose with those paths. Do not mix the two models in an installation that already has data without a migration plan. In Docker rootless, user namespaces, or SELinux, matching UIDs and labels requires adaptation; do not resolve it with chmod 777. Reference: RustFS with Docker.
Validate the API, console, and remote access
From the host itself, use the documented endpoints:
curl --fail --silent --show-error http://127.0.0.1:9000/health/live
curl --fail --silent --show-error http://127.0.0.1:9000/health/ready
curl --fail --silent --show-error http://127.0.0.1:9001/rustfs/console/health
sudo ss -lntp | grep -E ':(9000|9001)\b'
Liveness checks the process; readiness checks required dependencies and may return 503. Neither proves that your user can write an object. Open http://127.0.0.1:9001/rustfs/console/ and sign in with the generated credentials. The S3 API uses 9000; sending an S3 client to 9001 is an endpoint error. Port and health check reference.
If the server is remote, keep the ports closed and open a tunnel from your computer, replacing user and host. The local ports must be free:
ssh -N -o ExitOnForwardFailure=yes \
  -L 127.0.0.1:9000:127.0.0.1:9000 \
  -L 127.0.0.1:9001:127.0.0.1:9001 usuario@servidor
With the tunnel open, browser and S3 client on your computer use the same local addresses. This is suited to administration and staging, it does not replace the HTTPS endpoint that remote applications will need to use. For Docker, also check docker compose ps and the published mappings: not every network mode shows up as a listening process on ss.
S3 test: create a bucket, upload, and verify the download
Install the AWS CLI v2 using the official procedure and check aws --version. Using it as a RustFS client does not require creating an AWS account. To avoid mixing credentials with existing profiles, open a new terminal and use isolated configuration files:
umask 077
CLIENT_DIR=$(mktemp -d "$HOME/rustfs-client.XXXXXX")
export AWS_CONFIG_FILE="$CLIENT_DIR/config"
export AWS_SHARED_CREDENTIALS_FILE="$CLIENT_DIR/credentials"
unset AWS_ACCESS_KEY_ID AWS_SECRET_ACCESS_KEY AWS_SESSION_TOKEN AWS_PROFILE
unset AWS_DEFAULT_PROFILE AWS_ENDPOINT_URL AWS_ENDPOINT_URL_S3
unset AWS_ROLE_ARN AWS_WEB_IDENTITY_TOKEN_FILE
aws configure --profile rustfs-lab
aws configure set s3.addressing_style path --profile rustfs-lab
Enter the RustFS access key and secret key at the prompts, region us-east-1 and format json. The explicit endpoint below points to the local RustFS, not to AWS. Use the administrative credential only in this controlled bootstrap; for the real application, create a limited identity as in the next section. AWS CLI files and profiles.
cd "$CLIENT_DIR"
export AWS_PAGER=""
ENDPOINT=http://127.0.0.1:9000
BUCKET="linuxpro-lab-$(date +%s)"
printf 'Teste RustFS LinuxPro\n' > original.txt

aws --profile rustfs-lab --endpoint-url "$ENDPOINT" s3api create-bucket \
  --bucket "$BUCKET"
aws --profile rustfs-lab --endpoint-url "$ENDPOINT" s3api put-object \
  --bucket "$BUCKET" --key teste/original.txt --body original.txt
aws --profile rustfs-lab --endpoint-url "$ENDPOINT" s3api get-object \
  --bucket "$BUCKET" --key teste/original.txt recebido.txt
sha256sum original.txt recebido.txt
cmp original.txt recebido.txt && echo "Conteúdo idêntico"
The expected result is the message Conteúdo idêntico and equal hashes. This proves the content of that object in the tested flow, not the server's full compatibility. Do not use ETag as a universal synonym for MD5: multipart and encryption can change its interpretation. References: create-bucket, put-object and get-object.
Restart only the chosen installation: sudo systemctl restart rustfs or, in the project folder, docker compose restart rustfs. Wait for readiness and repeat the GET and the cmp. To validate container persistence, then perform a controlled recreation with docker compose up -d --force-recreate, preserving the volumes, and repeat the read.
When finished, remove only the object and bucket from this test, which did not enable versioning:
aws --profile rustfs-lab --endpoint-url "$ENDPOINT" s3api delete-object \
  --bucket "$BUCKET" --key teste/original.txt
aws --profile rustfs-lab --endpoint-url "$ENDPOINT" s3api delete-bucket \
  --bucket "$BUCKET"
Close the test terminal to discard the variables. The credential files remain in the printed/created directory; remove them deliberately when no longer needed and revoke the test credentials. Never perform a recursive cleanup of a real bucket to reproduce the example.
Don't use the root credential in the application
In the console, create a dedicated user, a policy, and, when appropriate, a service account. The example policy below allows listing and manipulating objects only in the bucket linuxpro-app. Create this bucket administratively beforehand. The resource name is illustrative and must match the actual bucket.
{
  "Version": "2012-10-17",
  "Statement": [
    {
      "Effect": "Allow",
      "Action": ["s3:ListBucket", "s3:GetBucketLocation"],
      "Resource": ["arn:aws:s3:::linuxpro-app"]
    },
    {
      "Effect": "Allow",
      "Action": ["s3:GetObject", "s3:PutObject", "s3:DeleteObject"],
      "Resource": ["arn:aws:s3:::linuxpro-app/*"]
    }
  ]
}
It is a starting point for simple operations, not a universal policy: multipart, versioning, or other features may require additional actions. Remove delete if the application does not need it. Attach the policy to the appropriate user and also test a forbidden operation, such as reading another bucket. Service account policies restrict the parent identity; they do not automatically grant privileges the parent does not have. IAM and RustFS policies.
TLS before opening the API to the network
HTTP on the loopback serves the lab; remote applications should use HTTPS. RustFS documents native TLS using RUSTFS_TLS_PATH and two PEM files called rustfs_cert.pem and rustfs_key.pem. The certificate must be valid for the DNS used by the clients, with a trusted chain. Do not use --no-verify-ssl as a permanent solution. Official TLS configuration.
For the binary, first obtain the certificate according to the organization's policy. Copy it to a dedicated directory, with the key readable by the service and not by all users:
sudo install -d -o root -g rustfs -m 0750 /etc/rustfs/tls
sudo install -o root -g rustfs -m 0640 /CAMINHO/fullchain.pem \
  /etc/rustfs/tls/rustfs_cert.pem
sudo install -o root -g rustfs -m 0640 /CAMINHO/privkey.pem \
  /etc/rustfs/tls/rustfs_key.pem
sudoedit /etc/default/rustfs
Replace /CAMINHO with the actual files. Add RUSTFS_TLS_PATH=/etc/rustfs/tls. If remote clients are needed, change the API bind to the chosen private interface IP and open that port only to authorized networks. The console can remain on the loopback. Restart and test HTTPS using the certificate's hostname. Renewal must update the copied files and include a controlled restart; renewing the original certificate does not automatically update this copy.
In Docker, mount the certificates directory as read-only and configure RUSTFS_TLS_PATH for the internal path. Ensure read access for the UID/GID 10001 without making the key public. Native TLS affects both listeners: also change client URLs and the healthcheck to HTTPS, using a hostname compatible with the certificate and the correct CA. Do not keep the HTTP healthcheck shown in the lab after enabling TLS.
If you prefer a reverse proxy, use a hostname dedicated to the API and preserve the Host, path, and signed query string. Do not add an arbitrary prefix like /s3/: this could invalidate signatures. Upload limits, timeouts, and streaming need to be validated with real objects, including multipart. The Console and the API have different exposure policies.
Versioning, retention, and backup are different layers
- Versioning: helps recover previous versions, but increases consumption and requires a policy for old versions.
- Lifecycle: automates expiration or transition; an incorrect rule also automates unwanted deletion.
- Object Lock: adds retention restrictions; plan carefully before applying it to data that will later need to be removed.
- Replication: can also copy logical errors, depending on the configuration. Do not treat it automatically as an independent backup.
- Backup: requires a separate destination, protected credentials, and rehearsed recovery, including the settings and keys needed for reading.
Do not simply copy visible files from the internal directory with the service writing and assume this forms a consistent snapshot. For portability, use S3 tools and verify what they preserve: versions, delete markers, policies, retention, and metadata do not necessarily accompany a simple object copy.
The rclone guide helps with planning. First do inventory and non-destructive copy; sync can delete what only exists at the destination. For migration, keep the source intact until validating the application, the count, the content, and the rollback procedure.
Operations: health, capacity, and updates
Monitor storage as a data service: free space, growth, I/O errors, latency and API errors, authentication failures, incomplete uploads, and certificate validity. In a cluster, add quorum, unavailable disks, healing, and replication. Process health is not synonymous with write capability. The official rc client complements console and APIs for administrative inspection.
For centralized telemetry, see OpenObserve: logs, metrics, and traces. If the goal is to use RustFS as storage for OpenObserve, refer to the dedicated server guide. They are different roles: RustFS stores objects; OpenObserve interprets and queries telemetry.
Before upgrading, read the release, record version and digest, back up, and test restoration. For the binary option, install the new executable next to the previous one, stop the service, switch the link, and validate readiness and an S3 test. For the Docker option, change the image in Compose, pull, and recreate preserving volumes. A single node will experience service interruption.
Rollback isn't just about keeping the previous executable. If the update changes persisted state, rolling the binary back may not be supported. Check the release notes for compatibility and keep a restore path. Don't improvise a rolling update in a cluster without understanding quorum and waiting for each node to come back ready. Official upgrade procedures.
Common problems and how to investigate
| Symptom | What to check |
|---|---|
| Permission denied | Owner of the directory, UID 10001 inside the container, mount, and TLS key permissions. Don't use 777. |
| Port in use | Another instance or another service on 9000/9001. Pick one method and review the mapping. |
| Health live OK, ready 503 | Dependencies not ready yet, storage/IAM, and in a cluster, peers and quorum. Read the response body and the logs. |
| SignatureDoesNotMatch | Key, secret, region, clock, endpoint, and Host/path changes in the proxy. |
| 403 AccessDenied | Identity, bucket, and required operation policy. Do not grant administrator as a generic fix. |
| Console opens, S3 client fails | Client on the API 9000, not on the console 9001; URL, TLS, and path-style according to the configuration. |
| Data “disappeared” after recreation | Volume actually used, Compose project name, and mount destination. Do not create new buckets before identifying the previous volume. |
If there is an integrity error, stop making exploratory changes to the disks and preserve logs and recovery copies. Deleting internal metadata to “force the start” can worsen the problem.
Stop the lab without destroying the objects
In the binary option, sudo systemctl stop rustfs the process and preserves data and configuration. In the Docker option, enter the project folder and run:
docker compose downWithout -v, named volumes remain. Do not use docker compose down -v, docker volume prune or deleting the directory as a routine update procedure. These operations can destroy persistence. Data cleanup should only occur after checking the environment and explicitly deciding that it is disposable.
Checklist before thinking about production
- Version and checksum/digest recorded; process without root.
- Default credentials removed and application identity restricted.
- API and console with deliberate exposure; TLS validated without bypass.
- Disks and persistent volumes identified and monitored.
- Upload, download, checksum, and read-after-restart approved.
- Independent backup and restore rehearsed.
- Retention, old versions, multipart, and capacity accounted for.
- Compatibility limits tested with the real workload.
- Topology compatible with availability requirements.
The best start is small but verifiable: a fixed version, one bucket, one checked object, and a recovery that works. Then scale up the load and the architecture with evidence—not because “S3-compatible” or “written in Rust” replaces planning.