

A single Valkey can handle a lot, but when it goes down it takes the cache, sessions, and application queues with it. Cluster mode solves both problems at once: it splits the data across multiple primaries and leaves a replica ready to take over each shard when a server dies. In this guide we set up a cluster with 3 primaries and 3 replicas, deliberately take down a primary, and measure how long writes were stalled. We also added and removed nodes, turned on persistence, ACL and TLS, configured the service with systemd and connected Valkey Admin to the cluster. Everything was actually run in a Docker lab with Valkey 9.1.2, and the outputs shown below came from that test.
What is Valkey
In 2024 March, Redis Inc. changed Redis's license, which was BSD, to licenses source available. On that day of the month the 28 Linux Foundation announced Valkey, a fork created by former maintainers and contributors of the project from Redis 7.2.4. Valkey continues with the BSD 3-clause license and has open governance. AWS, Google Cloud, Oracle, Ericsson, and Snap have supported the project since the announcement. The protocol remains the same, so clients and tools made for Redis generally work without changes.
Versions in 23/09/2026, checked in the GitHub releases and in the download page:
- 9.1.2 (31/08/2026): current stable. It is a security release that fixes two use-after-free bugs (one of them in the Lua interpreter state, exploitable without authentication) and dozens of bugs, several of them in cluster and slot migration. Update.
- 9.0.6 and 8.1.10 (01/09/2026): latest fixes from previous series that still receive support.
- 9.2.0-rc1 (16/09/2026): release candidate. Do not use in production.
News from the last two major versions that change how a cluster operates, according to the official announcements of Valkey 9.0 and Valkey 9.1:
- Atomic Slot Migration (9.0): resharding now moves the entire slot, rather than key by key. The source node keeps all data until the migration completes, which avoids intermediate redirections and stalls with very large keys. The command is
CLUSTER MIGRATESLOTS, which we use further below. - Numbered databases in cluster mode (9.0):
SELECT 1now works in a cluster. In Redis and in earlier versions of Valkey, the cluster only accepted db 0. - Hash field expiration (9.0): commands like
HEXPIRE,HSETEXandHGETEX. - Large clusters (9.0): the project reports scale of up to 2.000 nodes and over 1 billion requests per second.
- ACL per database (9.1):
ACL SETUSER app ... db=0,1restricts a user to certain databases. - Lua as a module (9.1): Lua has left the core and can be turned off when not in use.
- TLS (9.1): automatic certificate reload, expiration date on
INFOand authentication by SAN URI. - JSON logging (9.1):
log-format jsoninvalkey.conf. - Memory and performance (9.1): small strings use up to 20% less memory, there's a new I/O threads model and the new commands
HGETDELandMSETEX.
How the cluster works
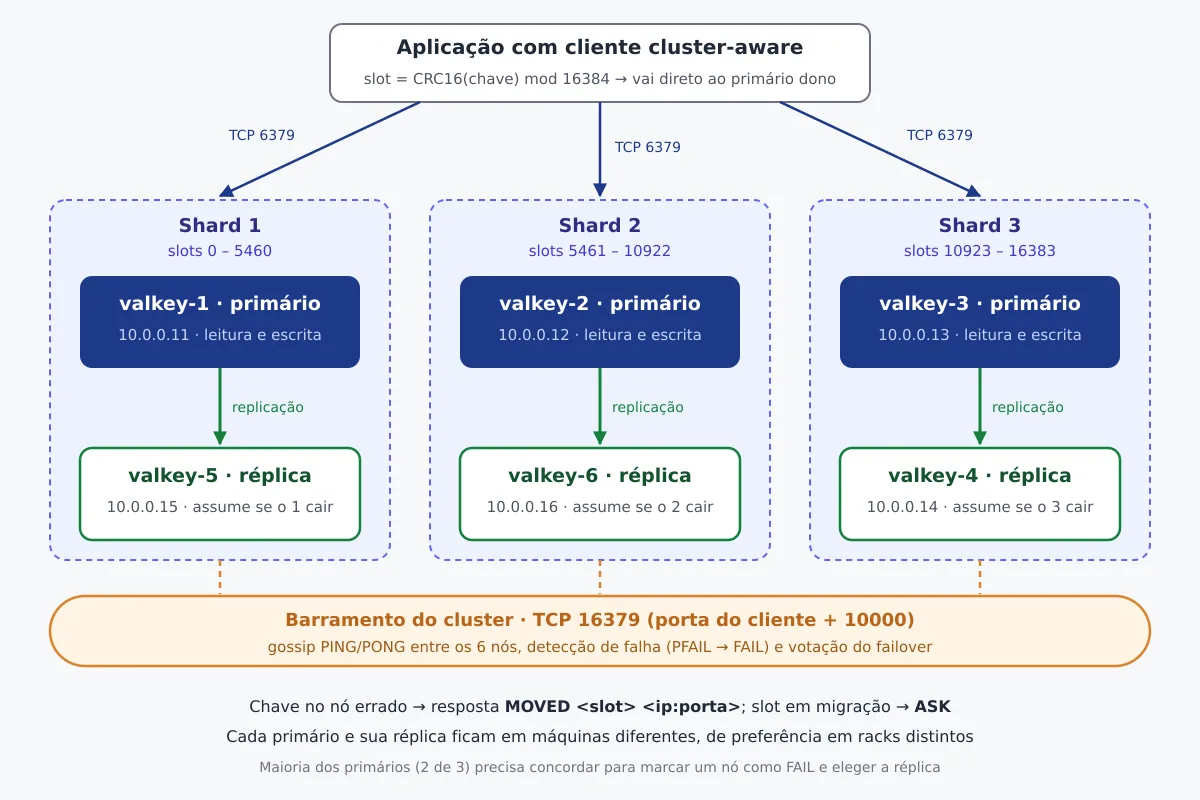
The Valkey Cluster divides the keyspace into 16384 hash slots. The slot of a key is CRC16(chave) mod 16384, and each primary owns a range of slots. With 3 primaries, the default split is as follows: 0–5460, 5461–10922, and 10923–16383. Each primary has one or more replicas, which receive the data via asynchronous replication and stay ready to take over.
- Cluster bus: in addition to the client port, each node opens a second TCP port, which by default is the client port plus 10000 (16379). Through it, the nodes exchange binary gossip that is, PING/PONG with the state of each node, the slot map, and the failover votes.
- Failure detection: if a node stops responding for more than
cluster-node-timeout, whoever notices marks it asPFAIL(probable failure). When the majority of primaries report the same, it becomesFAILand this information spreads across the cluster. - Automatic failover: the replica of the primary in
FAILrequests votes from the other primaries. With the majority of votes, it promotes itself, increments the config epoch and starts serving the slots of the primary that went down. - MOVED: when the client requests a key from a node that does not own the slot, it receives
MOVED <slot> <ip:porta>. A client cluster-aware updates the slot map and goes directly to the correct node. - ASK: appears while a slot is migrating and the key has already moved to the destination. The redirection applies only to that request, and the client does not update the map.
- Hash tags: when the key has
{...}, only the portion inside braces is included in the slot calculation.{pedido:42}:itensand{pedido:42}:totalfall into the same slot and can be used together inMSET, transactions and scripts.
Cluster or Sentinel?
Both options deliver high availability, but solve different problems:
| Sentinel | Cluster | |
|---|---|---|
| Data | A single primary with the entire dataset | Dataset split across multiple primaries (sharding) |
| Write scale | From one server | Grows with the number of primaries |
| Failover | Processes valkey-sentinel separate vote and promote the replica |
The nodes themselves vote over the bus |
| Client | Asks Sentinel who the primary is | Needs to understand MOVED/ASK (cluster mode) |
| Multi-key commands | Free | Only with keys in the same slot (hash tags) |
| Numbered databases | Yes | Yes starting from Valkey 9.0 |
If the dataset fits on a single server and the application depends on many multi-key commands, the Sentinel is simpler. If you need more memory or more write throughput than a single machine can deliver, the path is the cluster.
Requirements and ports
- Minimum of 3 primaries. A documentation recommends 6 nodes (3 primaries and 3 replicas), and each primary must be on a different machine from its replica.
- TCP 6379 (clients and replication) and TCP 16379 (bus) open between all nodes. Clients need to reach the 6379 of all the nodes, not just one.
- No NAT or port remapping. The cluster advertises its own IP and its own port, and Docker with
-p 7000:6379breaks the redirects. In the lab below we use a bridge network with a fixed IP per container and without publishing ports. In Kubernetes, use thecluster-announce-ip/cluster-announce-hostnameor the official Helm chart. - The bus does not authenticate messages. Per the documentation, port 16379 accepts whatever arrives. Protect it with a firewall allowing only the nodes' IPs, or with mTLS (
tls-cluster yes).
Docker lab: 6 nodes in 5 minutes
The lab uses the official image valkey/valkey:9.1.2 on a dedicated bridge network, and each node gets a fixed IP. If you need a review on containers, see the history of Docker. Start with the configuration file that the six nodes will share:
mkdir -p ~/valkey-lab && cd ~/valkey-lab
cat > valkey.conf <<'EOF'
port 6379
bind 0.0.0.0
protected-mode no
cluster-enabled yes
cluster-config-file nodes.conf
cluster-node-timeout 5000
appendonly yes
appendfsync everysec
save 900 1 300 10
dir /data
EOF

docker network create --subnet 10.77.77.0/24 valkey-net

for i in 1 2 3 4 5 6; do
  docker run -d --name valkey-$i --hostname valkey-$i \
    --network valkey-net --ip 10.77.77.1$i \
    -v "$PWD/valkey.conf:/usr/local/etc/valkey/valkey.conf:ro" \
    valkey/valkey:9.1.2 valkey-server /usr/local/etc/valkey/valkey.conf
done

# contêiner "cliente" na mesma rede, para rodar valkey-cli e testes
docker run -d --name valkey-client --network valkey-net --ip 10.77.77.30 \
  valkey/valkey:9.1.2 sleep infinity
The protected-mode no without a password works only for the isolated lab. The security section shows what changes in production. Before creating the cluster, a freshly started node refuses writes:
$ docker exec valkey-1 valkey-cli set foo bar
CLUSTERDOWN Hash slot not served
Create the cluster with one replica per primary:
docker exec valkey-client valkey-cli --cluster create \
  10.77.77.11:6379 10.77.77.12:6379 10.77.77.13:6379 \
  10.77.77.14:6379 10.77.77.15:6379 10.77.77.16:6379 \
  --cluster-replicas 1 --cluster-yes
>>> Performing hash slots allocation on 6 node(s)...
Primary[0] -> Slots 0 - 5460
Primary[1] -> Slots 5461 - 10922
Primary[2] -> Slots 10923 - 16383
Adding replica 10.77.77.15:6379 to 10.77.77.11:6379
Adding replica 10.77.77.16:6379 to 10.77.77.12:6379
Adding replica 10.77.77.14:6379 to 10.77.77.13:6379
...
[OK] All nodes agree about slots configuration.
>>> Check for open slots...
>>> Check slots coverage...
[OK] All 16384 slots covered.CLUSTER INFO and CLUSTER NODES
$ docker exec valkey-client valkey-cli -h 10.77.77.11 cluster info | head -12
cluster_state:ok
cluster_slots_assigned:16384
cluster_slots_ok:16384
cluster_slots_pfail:0
cluster_slots_fail:0
cluster_nodes_pfail:0
cluster_nodes_fail:0
cluster_voting_nodes_pfail:0
cluster_voting_nodes_fail:0
cluster_known_nodes:6
cluster_size:3
cluster_current_epoch:6

$ docker exec valkey-client valkey-cli -h 10.77.77.11 cluster nodes
63fa7320... 10.77.77.12:6379@16379 master - 0 1790176949000 2 connected 5461-10922
6e304101... 10.77.77.14:6379@16379 slave 5eaf881d... 0 1790176949520 3 connected
4bc5ee75... 10.77.77.15:6379@16379 slave accd0471... 0 1790176949000 1 connected
accd0471... 10.77.77.11:6379@16379 myself,master - 0 0 1 connected 0-5460
57d5706c... 10.77.77.16:6379@16379 slave 63fa7320... 0 1790176948000 2 connected
5eaf881d... 10.77.77.13:6379@16379 master - 0 1790176948818 3 connected 10923-16383
In each line of CLUSTER NODES the node ID appears, ip:porta@porta-do-barramento, the role, the primary it replicates (in the case of replicas), the config epoch and the slot ranges. The IDs have been shortened here. The valkey-cli --cluster check 10.77.77.11:6379 shows the same information in an easier-to-read format and warns about open or discovered slots.
$ C="docker exec valkey-client valkey-cli"

$ $C -h 10.77.77.11 set usuario:1000 nilton
MOVED 7319 10.77.77.12:6379

$ $C -h 10.77.77.11 cluster keyslot usuario:1000
(integer) 7319

$ $C -c -h 10.77.77.11 set usuario:1000 nilton     # -c segue o redirecionamento
OK
$ $C -c -h 10.77.77.11 get usuario:1000
"nilton"

$ $C -c -h 10.77.77.11 mset a 1 b 2
CROSSSLOT Keys in request don't hash to the same slot

$ $C -h 10.77.77.11 cluster keyslot '{pedido:42}:itens'
(integer) 2873
$ $C -h 10.77.77.11 cluster keyslot '{pedido:42}:total'
(integer) 2873
$ $C -c -h 10.77.77.11 mset '{pedido:42}:itens' 3 '{pedido:42}:total' 99.90
OK
The -c does not resolve the CROSSSLOT, because the command needs to run entirely on a single node. To load test data, the valkey-benchmark has cluster mode:
docker exec valkey-client valkey-benchmark -h 10.77.77.11 --cluster \
  -t set,get -n 100000 -r 100000 -q

for i in 1 2 3; do docker exec valkey-$i valkey-cli dbsize; done
# 34705 / 32366 / 32931 chaves: distribuição equilibrada entre os shards
Failover in practice: taking down a primary
To measure failover, a script in the client container writes the key conta:1 every 100 ms. The key stays in slot 3844, which belongs to the primary 10.77.77.11. The script uses valkey-cli -c with a timeout of 0,5 s per attempt and notes when the first write fails and when writes resume:
cat > failover.sh <<'EOF'
#!/bin/bash
# Grava conta:1 (slot 3844) a cada 100 ms e mede quanto tempo as escritas falham.
ms() { date +%s%3N; }
falhou=0; n=0
while :; do
  n=$((n+1))
  r=$(timeout 0.5 valkey-cli -c -h 10.77.77.12 set conta:1 "$n" 2>&1)
  if [ "$r" != "OK" ]; then
    [ "$falhou" = 0 ] && falhou=$(ms) && echo "$(date +%T.%3N) primeira falha: ${r:-timeout}"
  elif [ "$falhou" != 0 ]; then
    echo "$(date +%T.%3N) escrita voltou; indisponivel por $(( $(ms) - falhou )) ms"; exit 0
  fi
  sleep 0.1
done
EOF
chmod +x failover.sh
docker cp failover.sh valkey-client:/failover.sh
docker exec -d valkey-client bash -c '/failover.sh > /failover.log 2>&1'
sleep 2; date -u +%T.%3N; docker kill valkey-1     # derruba o primário sem aviso
sleep 15; docker exec valkey-client cat /failover.log
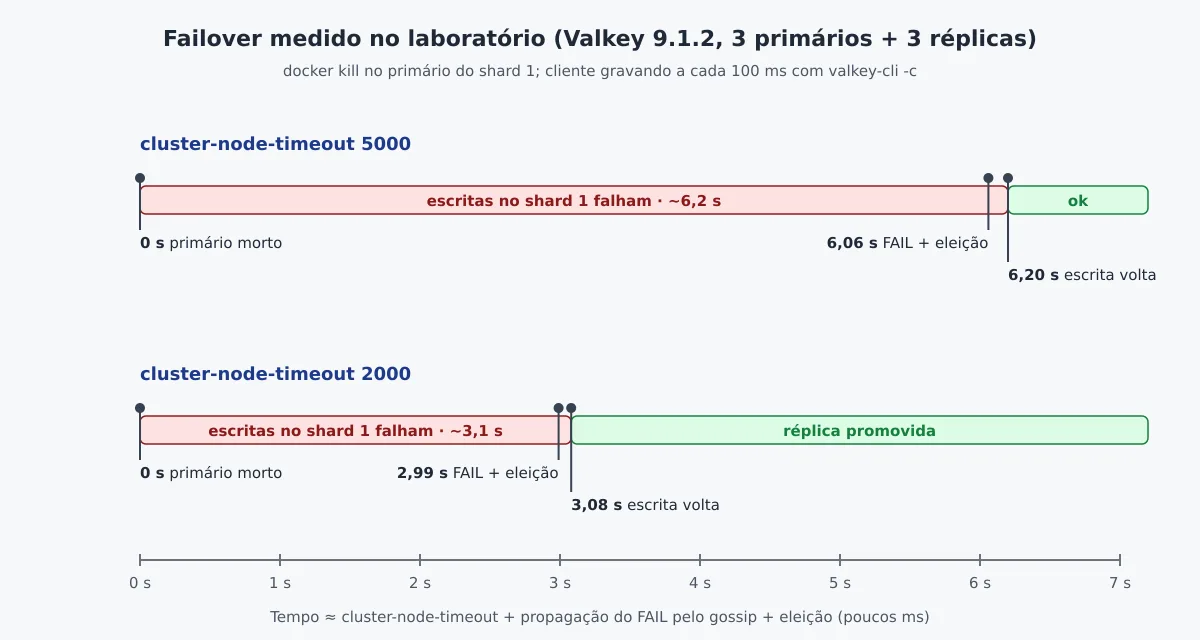
Result with cluster-node-timeout 5000. The docker kill ran to 15:23:07.013 (UTC):
15:23:07.589 primeira falha: timeout
15:23:13.216 escrita voltou; indisponivel por 5628 ms
The replica log valkey-5 shows the sequence:
15:23:13.076 * FAIL message received from 63fa7320... (10.77.77.12:6379) about accd0471... (10.77.77.11:6379)
15:23:13.076 # Cluster state changed: fail
15:23:13.076 * This is the best ranked replica and can initiate the election immediately.
15:23:13.076 * Starting a failover election for epoch 7, node config epoch is 1
15:23:13.079 * Failover election won: I'm the new primary.
15:23:13.079 * configEpoch set to 7 after successful failover
Between the death of the primary and the return of writes passed about 6,2 s. Nearly all that time was the cluster-node-timeout (5 s) added to the propagation of the FAIL via gossip. The election took 3 ms. We repeated the test with the timeout at 2000 ms (CONFIG SET cluster-node-timeout 2000 on all nodes), taking down the new primary. The FAIL went out 2,99 s after the kill and writes returned in about 3,1 s.
A shorter timeout is not free. A long network or disk pause, such as a large fork for RDB, can trigger an unnecessary failover. Between 2 and 5 seconds is a reasonable range on a local network, but measure it in your environment. After the failover, the old primary comes back as a replica of the promoted node:
$ docker start valkey-1
$ docker exec valkey-client valkey-cli -h 10.77.77.12 cluster nodes | grep -E '1[15]:'
accd0471... 10.77.77.11:6379@16379 slave 4bc5ee75... 0 1790177013144 7 connected
4bc5ee75... 10.77.77.15:6379@16379 master - 0 1790177012000 7 connected 0-5460
To return the primary role, without losing writes, run CLUSTER FAILOVER on the replica. ). The manual failover waits for the replica to catch up to the primary's offset before swapping roles. This is the right procedure for upgrading node by node:
docker exec valkey-client valkey-cli -h 10.77.77.11 cluster failover
docker exec valkey-client valkey-cli -h 10.77.77.11 role | head -1   # master
Adding nodes, rebalancing and removal
Bring up two new nodes with the same configuration (valkey-7 on 10.77.77.17 and valkey-8 on 10.77.77.18). One enters as an empty primary and the other as its replica:
C="docker exec valkey-client valkey-cli"
$C --cluster add-node 10.77.77.17:6379 10.77.77.11:6379
$C --cluster add-node 10.77.77.18:6379 10.77.77.11:6379 --cluster-replica
# sem --cluster-primaries-id, a réplica é associada ao primário com menos réplicas (o novo)
The new primary enters without slots. The rebalance distributes the slots evenly, and --cluster-use-empty-primaries is what makes it consider empty primaries:
$ time $C --cluster rebalance 10.77.77.11:6379 --cluster-use-empty-primaries
>>> Rebalancing across 4 nodes. Total weight = 4.00
Moving 1366 slots from 10.77.77.12:6379 to 10.77.77.17:6379
Moving 1365 slots from 10.77.77.13:6379 to 10.77.77.17:6379
Moving 1365 slots from 10.77.77.11:6379 to 10.77.77.17:6379
real  0m6,472s

$ $C --cluster info 10.77.77.11:6379
10.77.77.11:6379 (accd0471...) -> 26018 keys | 4096 slots | 1 replicas.
10.77.77.17:6379 (7149edd5...) -> 24991 keys | 4096 slots | 1 replicas.
10.77.77.13:6379 (5eaf881d...) -> 24782 keys | 4096 slots | 1 replicas.
10.77.77.12:6379 (63fa7320...) -> 24212 keys | 4096 slots | 1 replicas.
[OK] 100003 keys in 4 primaries.
To move a specific range there is --cluster reshard (--cluster-from, --cluster-to, --cluster-slots). In Valkey 9 you can also use the atomic migration directly, and that's how we emptied node 17 before removing it. The command is sent to the source, node, with one range per destination:
$ $C -h 10.77.77.17 cluster migrateslots \
    slotsrange 0 1364 node accd0471d25a3d53a1a66c41971d01adacdbbe70 \
    slotsrange 5461 6826 node 63fa7320b3a4524df08a5925ab94962b08b5c5e0 \
    slotsrange 10923 12287 node 5eaf881d4c3e5720ccf7cc369540e57ed00decfe
OK
$ $C -h 10.77.77.17 cluster getslotmigrations   # state: success em cada job
Detail observed in the test: after losing all slots, node 17 reconfigured itself as a replica of another primary. This is replica migration (cluster-allow-replica-migration, enabled by default). With the node empty, remove the replica first and then the old primary:
$C --cluster del-node 10.77.77.11:6379 <id-do-valkey-8>
$C --cluster del-node 10.77.77.11:6379 <id-do-valkey-7>
$C --cluster check 10.77.77.11:6379
# [OK] 100003 keys in 3 primaries.  [OK] All 16384 slots covered.
No key was lost in the back-and-forth: 100003 before and 100003 after. For the --cluster call, which runs the same command on all nodes, see the gotcha in the troubleshooting section.
Persistence: RDB and AOF
In the cluster, each node persists only its own slots. The options are the same as standalone Valkey (documentation):
- RDB (
save 900 1 300 10): periodic snapshot, compact, good for backup. It can lose writes made since the last snapshot. - AOF (
appendonly yes,appendfsync everysec): records every write and loses at most about 1 s. Since Redis 7 the AOF is multi-part: onebase.rdb, aincr.aofand a manifest.
$ docker exec valkey-1 ls /data /data/appendonlydir
/data:
appendonlydir  nodes.conf
/data/appendonlydir:
appendonly.aof.2.base.rdb  appendonly.aof.2.incr.aof  appendonly.aof.manifest

$ docker restart valkey-1 valkey-2 valkey-3 valkey-4 valkey-5 valkey-6
$ docker exec valkey-client valkey-cli --cluster info 10.77.77.11:6379 | tail -2
[OK] 100003 keys in 3 primaries.
The nodes.conf is not a data backup. It is the cluster state (IDs, epochs, slots), written by Valkey itself, and should not be edited by hand. Keep it alongside the backup, but do not copy it to another node. In pure cache mode you can turn off both (save "" and appendonly no). In this case the replica is the only copy, and a node that restarts comes back empty and syncs everything again.
Security: protected-mode, password, ACL and TLS
protected-mode
If the user default has no password and the protected-mode is enabled (default), Valkey only accepts connections through the loopback. A remote client receives:
DENIED Running in protected mode because protected mode is enabled and no password is set for the default user. In this mode connections are only accepted from the loopback interface. ...The way out is not to disable the protection. It is to set a password, or ACL users, and keep the bind on internal IPs.
Cluster password and authentication between replica and primary
In the cluster, replicas also authenticate to the primary, and therefore requirepass needs to go together with primaryauth (the old masterauth). In the lab we apply both with CONFIG SET and restart a replica. Since the mounted file was read-only, the configuration did not persist, and the replica came back without primaryauth:
master_link_status:down
# Unexpected reply to PSYNC from primary: -NOAUTH Authentication required.
# PRIMARY aborted replication with an error: NOAUTH Authentication required.
Put both directives in valkey.conf from all nodes, not just via CONFIG SET. With a password, the cluster tools receive -a (or --user/--pass):
valkey-cli -a 'SenhaForte' --no-auth-warning --cluster check 10.77.77.11:6379ACL per application
ACLs are not replicated by the bus. Create the user on each node, or keep a aclfile the same across all:
for i in 11 12 13 14 15 16; do
  valkey-cli -a 'SenhaForte' --no-auth-warning -h 10.77.77.$i \
    ACL SETUSER app on '>S3nhaApp!' '~app:*' '+@read' '+@write' '-@dangerous'
done

$ valkey-cli -c -h 10.77.77.11 --user app --pass 'S3nhaApp!' --no-auth-warning set app:config 1
OK
$ valkey-cli -c -h 10.77.77.11 --user app --pass 'S3nhaApp!' --no-auth-warning set outro:x 1
NOPERM No permissions to access a key
$ valkey-cli -c -h 10.77.77.11 --user app --pass 'S3nhaApp!' --no-auth-warning flushall
NOPERM User app has no permissions to run the 'flushall' command
TLS on clients, replication and bus
The official image and the official binary already come with TLS. We tested a separate cluster of 3 nodes with TLS only, using our own CA and a certificate with the IPs in the SAN:
openssl genrsa -out ca.key 4096
openssl req -x509 -new -nodes -key ca.key -sha256 -days 3650 -subj "/CN=Valkey CA" -out ca.crt
openssl genrsa -out valkey.key 2048
openssl req -new -key valkey.key -subj "/CN=valkey-cluster" -out valkey.csr
printf "subjectAltName=IP:10.77.77.21,IP:10.77.77.22,IP:10.77.77.23\nextendedKeyUsage=serverAuth,clientAuth\n" > ext.cnf
openssl x509 -req -in valkey.csr -CA ca.crt -CAkey ca.key -CAcreateserial \
  -days 825 -sha256 -extfile ext.cnf -out valkey.crt
# valkey.conf (trecho TLS)
port 0 # desliga a porta sem TLS
tls-port 6379
tls-cert-file /tls/valkey.crt
tls-key-file /tls/valkey.key
tls-ca-cert-file /tls/ca.crt
tls-cluster yes # barramento do cluster com TLS
tls-replication yes # replicação com TLS
tls-auth-clients yes # exige certificado do cliente (mTLS)T="--tls --cacert /tls/ca.crt --cert /tls/valkey.crt --key /tls/valkey.key"
valkey-cli $T --cluster create 10.77.77.21:6379 10.77.77.22:6379 10.77.77.23:6379 --cluster-yes
valkey-cli $T -c -h 10.77.77.21 set tls:ok sim # OK
valkey-cli $T -c -h 10.77.77.22 get tls:ok # "sim"
valkey-cli -h 10.77.77.21 ping # Error: Connection reset by peer
valkey-cli --tls --cacert /tls/ca.crt -h 10.77.77.21 ping # Error: Server closed the connectionThe first failure is a client without TLS talking to the TLS port. The second is a client with TLS but without its own certificate, rejected by the tls-auth-clients yes. In production, generate a certificate per node. For more context on certificates, see SSL/TLS in Postfix and Dovecot.
On real servers: official binary and systemd
Installation options on Ubuntu and Debian in September 2026:
- Official binary in valkey.io/download: tarballs for Ubuntu 22.04 (jammy) and 24.04 (noble), in x86_64 and arm64, with the latest version (9.1.2). This is what we use below.
- Distribution package: Ubuntu 26.04 LTS ships 9.0.4 (
apt install valkey-server valkey-tools, tested), Debian 13 ships 8.1.1, and Ubuntu 24.04 is still on 7.2.x. The packages already include the unitsvalkey-server.serviceandvalkey-server@.service.
On the six servers (here 10.0.0.11 through 10.0.0.16), tune the kernel as the administration documentation recommends:
echo 'vm.overcommit_memory = 1' | sudo tee /etc/sysctl.d/90-valkey.conf
sudo sysctl --system
echo never | sudo tee /sys/kernel/mm/transparent_hugepage/enabled   # persista via unit ou GRUB
Install the binary by verifying the SHA-256 and create user, directories, and configuration:
VER=9.1.2
cd /tmp
curl -fsSLO https://download.valkey.io/releases/valkey-${VER}-noble-x86_64.tar.gz
curl -fsSLO https://download.valkey.io/releases/valkey-${VER}-noble-x86_64.tar.gz.sha256
sha256sum -c valkey-${VER}-noble-x86_64.tar.gz.sha256      # ...tar.gz: OK
tar xzf valkey-${VER}-noble-x86_64.tar.gz
sudo install -m 755 valkey-${VER}-noble-x86_64/bin/* /usr/local/bin/

sudo useradd --system --home-dir /var/lib/valkey --shell /usr/sbin/nologin valkey
sudo install -d -o valkey -g valkey -m 750 /var/lib/valkey /var/log/valkey
sudo install -d -o root -g valkey -m 750 /etc/valkey
# /etc/valkey/valkey.conf (troque o IP do bind em cada servidor)
bind 10.0.0.11 127.0.0.1
port 6379
protected-mode yes
daemonize no
supervised systemd
dir /var/lib/valkey
logfile /var/log/valkey/valkey.log
cluster-enabled yes
cluster-config-file nodes-6379.conf
cluster-node-timeout 5000
appendonly yes
appendfsync everysec
save 3600 1 300 100
requirepass Troque-Esta-Senha
primaryauth Troque-Esta-Senha
maxmemory 2gb
maxmemory-policy noevictionsudo chown root:valkey /etc/valkey/valkey.conf
sudo chmod 640 /etc/valkey/valkey.confIn a cluster, maxmemory-policy noeviction makes the node refuse writes when memory runs out, instead of evicting data. For cache-only use, replace it with allkeys-lru. The systemd unit uses Type=notify, because the official binary is compiled with systemd support and signals when it's ready. For day-to-day systemd commands, see Mastering systemd.
# /etc/systemd/system/valkey.service
[Unit]
Description=Valkey (cluster node)
After=network-online.target
Wants=network-online.target

[Service]
Type=notify
User=valkey
Group=valkey
ExecStart=/usr/local/bin/valkey-server /etc/valkey/valkey.conf
Restart=on-failure
LimitNOFILE=65535
TimeoutStartSec=60
TimeoutStopSec=60
NoNewPrivileges=yes
ProtectSystem=full
ProtectHome=yes
PrivateTmp=yes
ReadWritePaths=/var/lib/valkey /var/log/valkey /etc/valkey

[Install]
WantedBy=multi-user.target
sudo systemctl daemon-reload
sudo systemctl enable --now valkey
systemctl status valkey # Active: active (running) ... Status: "Ready to accept connections"No need ExecStop. systemd sends SIGTERM, and Valkey does fsync of the AOF, writes the final RDB, and saves the nodes.conf before exiting. In the test, the log recorded “Saving the final RDB snapshot before exiting” and “Valkey is now ready to exit”. The /etc/valkey goes into ReadWritePaths in case you use CONFIG REWRITE. Open the ports only for the network of the nodes and clients:
sudo ufw allow from 10.0.0.0/24 to any port 6379,16379 proto tcpFinally, from any of the servers:
valkey-cli -a 'Troque-Esta-Senha' --no-auth-warning --cluster create \
  10.0.0.11:6379 10.0.0.12:6379 10.0.0.13:6379 \
  10.0.0.14:6379 10.0.0.15:6379 10.0.0.16:6379 --cluster-replicas 1
Replicating this on six machines is work for automation. The guide on Ansible covers the basics to turn the steps above into a playbook.
Valkey Admin: the cluster on one screen
The Valkey Admin is the project's official observation and management tool, licensed under Apache 2.0. Version 1.0 was released in May 2026 and the current one is 1.1.1 (14/08/2026). It runs as a desktop application for Linux (.deb and AppImage) and macOS, or as a web application on Docker/Kubernetes. Features include a dashboard for memory, CPU, clients, and hit ratio, key browser, command sending with autocompletion, cluster topology map, hot keys, big keys (new in 1.1), and the COMMANDLOG aggregated across all nodes.
In the lab we run the web version on the same network as the cluster, published only on localhost:
docker run -d --name valkey-admin --network valkey-net --ip 10.77.77.60 \
  -p 127.0.0.1:18080:8080 \
  -e DEPLOYMENT_MODE=Web \
  -e VALKEY_HOST=10.77.77.11 -e VALKEY_PORT=6379 \
  -e VALKEY_AUTH_TYPE=password -e VALKEY_USERNAME=default \
  -e 'VALKEY_PASSWORD=SenhaForte' \
  valkey/valkey-admin:1.1.1

docker logs valkey-admin
# Server running at http://localhost:8080
# Starting metrics server for:  10-77-77-11-6379
# Starting metrics server for:  10-77-77-12-6379
# Starting metrics server for:  10-77-77-13-6379
# Cluster nodes and metrics servers are in sync
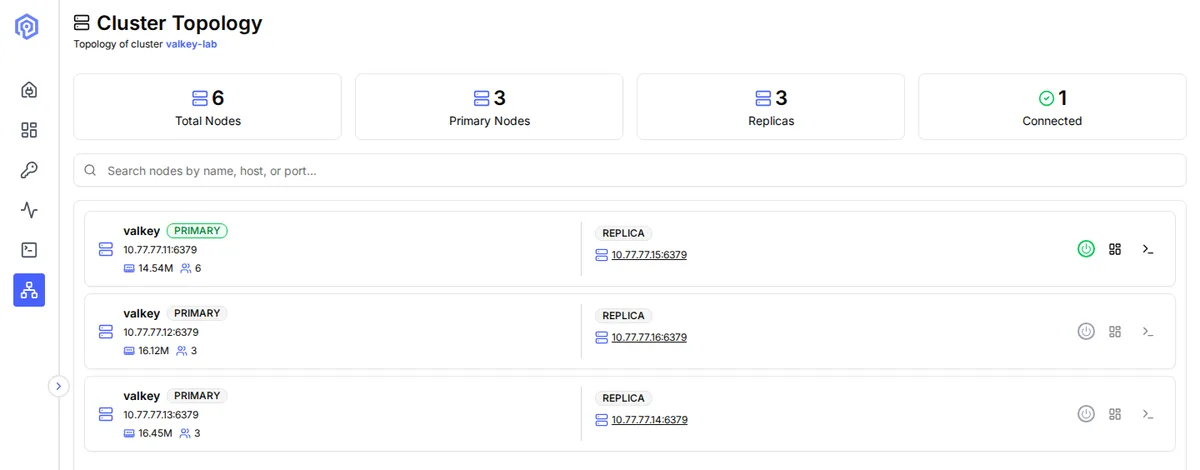
The variables VALKEY_* start metric collection (one collector per primary), but the interface starts empty. Open http://127.0.0.1:18080, click on + Add Connection and choose Discovery for cluster. Fill in host, port, user, and password. Note: in our test, the Use TLS option came checked by default in Discovery mode, and the connection was stuck at Connecting… until we unchecked the option, since the lab cluster does not use TLS. Once connected, the Cluster Topology showed the 6 nodes with the correct primary/replica pairs:
Read the limitations before putting it into production:
- It has no own login or RBAC. Whoever accesses the interface runs any command that the configured user's ACL allows. Put it behind an authenticated proxy (nginx, oauth2-proxy) and connect with a restricted ACL user.
- No mTLS support. Only TLS with password. The TLS cluster with
tls-auth-clients yesthat we set up above is not compatible. - The metrics come only from the primaries, and the key browser samples around 1.000 keys (the search uses
SCAN MATCH).
Monitoring
Valkey Admin is good for investigating problems, but alerting is Prometheus's job. The Valkey blog has a guide on exporters that uses redis_exporter, compatible with Valkey. The minimum alerts are cluster_state different from ok, master_link_status:down on the replicas, memory close to maxmemory shard without a replica. If Prometheus is not yet up, start with Monitoring Linux Servers with Prometheus. For a simple external TCP check on 6379 of each node, the Go Uptime resolves.
Troubleshooting: errors that appeared in the lab
CLUSTERDOWN Hash slot not served: the node is in cluster mode, but no node owns the slot. This happens before the--cluster createor when slots have no owner. Runvalkey-cli --cluster checkand, if applicable,--cluster fix.CLUSTERDOWN The cluster is down: appeared for an instant right after the--cluster createin the TLS cluster, while the nodes were converging. Two seconds later it wasok. It also appears when a shard loses the primary and the replica. We took down nodes 3 and 4 together, andcluster_slots_okdropped to 10923. Withcluster-require-full-coverage no, healthy shards keep serving and only the keys on the dead shard fail.MOVED 7319 10.77.77.12:6379: client without cluster mode. Usevalkey-cli -cor a library with cluster support. If the redirection points to an unreachable IP, the problem is NAT orcluster-announce-ipwrong.ASK 3844 10.77.77.12:6379: reproduced by marking the slot asMIGRATING/IMPORTINGby hand, in the middle of a key-by-key migration. The client with-ccontinues on its own. If a slot gets stuck in that state, the--cluster checkreports open slots, andCLUSTER SETSLOT <slot> STABLEor the--cluster fixresolve them.CROSSSLOT Keys in request don't hash to the same slot: multi-key command with keys in different slots. Use hash tags ({pedido:42}:...).master_link_status:downwithNOAUTHin the replica's log: missingprimaryauthon the node.DENIED Running in protected mode: remote connection without a password for the default user.Unrecognized option or bad number of args for: '-@dangerous': thevalkey-cli --cluster callinterprets arguments that begin with-as options of the tool itself. Create ACLs with a loop per node, as shown above.- The
AUTH faileddoes not interrupt thevalkey-cli. That was the lab's scare. We ran commands with--user appbefore the user existed. Thevalkey-clishowedAUTH failed: WRONGPASSand continued executing the commands as userdefault, who at that moment had no password. AFLUSHALLtest passed and wiped the shard 1 entirely (cmdstat_flushall:calls=1inINFO commandstats). One more reason to never leave the userdefaultwithout a password.
Cleaning up the lab
docker rm -f valkey-{1..8} valkey-client valkey-admin 2>/dev/null
docker network rm valkey-net
Conclusion
Valkey inherited Redis' cluster and has been improving exactly the part that caused the most trouble: resharding became atomic, the cluster now accepts numbered databases, and version 9.1 brought per-database ACLs and TLS with certificate rotation. In the test, failover took about 6 s with the cluster-node-timeout tutorial default and about 3 s with 2000 ms, without intervention. This number is what you should bring to the conversation with the application team, along with the requirement of a client that understands cluster. If your problem is high availability for a relational database, see the MariaDB Galera cluster with mariabackup. If the cluster will run on bare-metal Kubernetes, the MetalLB resolves services exposure.