

Everyone has a database backup. Few people have a backup that has already been restored. The Databasus targets exactly that gap: it is a self-hosted tool, with a web interface, that schedules dumps of PostgreSQL, MySQL, MariaDB and MongoDB, compresses, encrypts, sends them to S3, Google Drive, SFTP or local disk, notifies on Telegram or Slack and, for PostgreSQL, also spins up a disposable container, restores the backup and counts the rows of each table to prove it works.
The project is open source under the Apache 2.0 license, written in Go (backend) and TypeScript (frontend), and runs on Docker. In this post we look at how it works internally, install it, set up a MariaDB/MySQL backup, understand PostgreSQL PITR 17 and build the restore verification agent.
From Postgresus to Databasus
The project was born as Postgresus, created by Rostislav Dugin, and was only for PostgreSQL. When it gained support for MySQL, MariaDB, and MongoDB, the name stopped making sense and it became Databasus, at the end of 2025 (the “Upgrade path from Postgresus to Databasus” migration issues are from December 2025). The old repository RostislavDugin/postgresus now redirects to databasus/databasus.
In September 2026 the repository passes 8.600 stars, the Docker Hub image has more than 1,9 million pulls, and the latest version is v3.60.0, from 22/09/2026. The release pace is high, so check the releases page before pinning a version.
Does it back up MySQL and MariaDB? Yes, but only logical
That's the question that matters most for anyone running LAMP. The short answer: yes, with a limitation that needs to be clear.
| Database | Versions | Backup type | Tool used |
|---|---|---|---|
| PostgreSQL | 14, 15, 16, 17, and 18 | logical and physical (physical only on 17+) | pg_dump, pg_basebackup, pg_receivewal |
| MySQL | 5.7, 8.0, 8.4, 9, and 26 | logical only | mysqldump |
| MariaDB | 5.5, 10, 11, 12, and 13 | logical only | mariadb-dump |
| MongoDB | 4.2+, 5, 6, 7, and 8 | logical only | native dump |
For MySQL, Databasus calls the mysqldump official; for MariaDB, it uses the mariadb-dump native one, instead of the MySQL dump, which avoids incompatibilities with MariaDB-specific features. The binaries for each version are embedded in the image, so you don't install any client. Looking at the backend code, the parameters passed to the dump are these:
--single-transaction: consistent InnoDB snapshot, without locking tables;--routines,--triggersand--events: procedures, functions, triggers and scheduled events are included in the backup;--quickand--max-allowed-packet=1G: rows are streamed, without loading entire tables into memory;--no-tablespaces: waives the privilegePROCESS;- zstd network compression in MySQL 8.0+ (in 5.7 it falls back to the old compression).
There's a caveat with MariaDB Galera: during restore, Databasus turns off replication only in that session (wsrep_on), so that the dump is not replicated row by row by the cluster. This can be disabled in the database configuration. Anyone running the Galera cluster will appreciate this detail.
The password goes into a .my.cnf temporary file with permission 0600, never on the command line, so it doesn't show up in ps or in the logs.
What you don't have in MySQL/MariaDB: physical, incremental, or PITR backup with binlog. For large databases (the project site itself talks about something above 100 GB) or when you need to go back to the exact second before a DELETE wrong command, keep using mariabackup/XtraBackup and binlog, as I showed in the post about MariaDB Galera cluster with mariabackup. The automatic restore verification, described below, is also only for PostgreSQL for now. For the database of a medium-sized WordPress, GLPI, or Nextcloud, the daily dump with GFS retention works well.
How it works internally
Databasus runs far from the database. It connects over the network, like any client, and pulls the dump in streaming, block by block. Nothing is installed on the database server. If the database is on a closed network, it reaches it via an SSH tunnel through a bastion. This also means it works with managed databases (RDS, Cloud SQL, Azure Database), which don't let you install anything on the host.
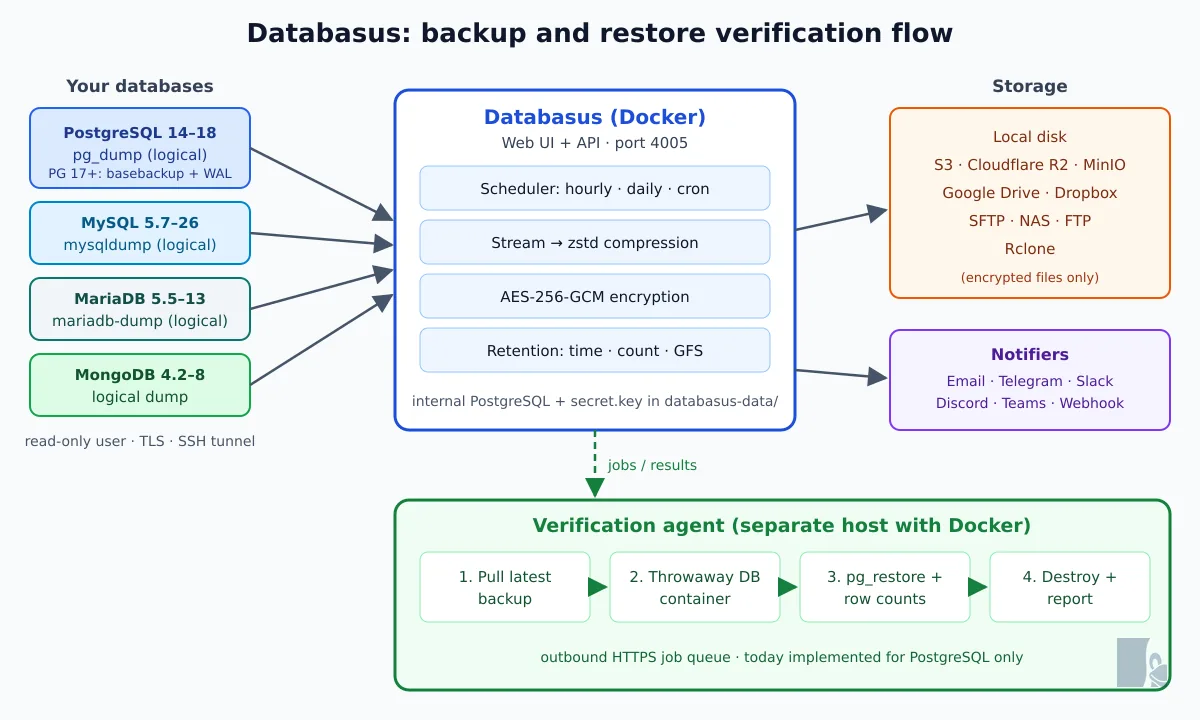
The flow of each backup:
- the scheduler triggers on schedule (hourly, daily, weekly, monthly, or cron);
- the dump streams out of the database and is compressed with zstd (in PostgreSQL, custom format of
pg_dumpwith zstd level 5); - each file is encrypted with AES-256-GCM, with its own key derived from the master key, the backup ID, and a random salt;
- the file goes to the chosen storage, which only sees encrypted data;
- the retention policy deletes old ones: by time, by count, by size, or using the GFS scheme (grandfather-father-son, with copies per hour, day, week, month, and year);
- the notifier reports success or failure.
The internal state (schedules, users, history) is stored in an embedded PostgreSQL within the image itself, at databasus-data/pgdata, and the database credentials are encrypted with the key databasus-data/secret.key. Keep that key somewhere else: without it, the encrypted backups become garbage.
Installation
There are four paths: automatic script, docker run, Docker Compose, and Helm. If Docker is still new to you, the post The history of Docker provides the context.
Script (Debian/Ubuntu)
Install Docker and Compose if they're missing, put everything in /opt/databasus/ and configure automatic startup on boot:
sudo apt-get install -y curl
curl -sSL https://raw.githubusercontent.com/databasus/databasus/refs/heads/main/install-databasus.sh -o install-databasus.sh
less install-databasus.sh     # leia antes de rodar como root
sudo bash install-databasus.sh
Docker Compose
This is the path I prefer, because it stays versioned along with the rest of the infrastructure:
services:
  databasus:
    container_name: databasus
    image: databasus/databasus:latest
    ports:
      - "127.0.0.1:4005:4005"
    volumes:
      - ./databasus-data:/databasus-data
    restart: unless-stopped
    healthcheck:
      test: ["CMD", "databasus", "healthcheck"]
      interval: 30s
      timeout: 5s
      retries: 3
      start_period: 60s
mkdir -p /opt/databasus && cd /opt/databasus
# salve o docker-compose.yml acima aqui
docker compose up -d
docker compose psI published the port on 127.0.0.1 on purpose: the interface stores credentials for all your databases, so it sits behind a reverse proxy with TLS, not exposed raw on the internet. If Docker Hub throttles the pull, the same image is available at ghcr.io/databasus/databasus:latest. In production, replace latest with a fixed tag.
Kubernetes with Helm
helm install databasus oci://ghcr.io/databasus/charts/databasus \
  -n databasus --create-namespace \
  --set ingress.enabled=true \
  --set ingress.hosts[0].host=backup.exemplo.com.br
The chart also supports service.type=LoadBalancer, NodePort, and Gateway API HTTPRoute. On bare metal, the MetalLB returns the LoadBalancer's IP.
Building the image from source
If your policy requires a home-built image (audit, internal registry, no pull from Docker Hub), the Dockerfile at the repository root does everything in stages: frontend with Node 24 and pnpm, backend and verification agent with Go 1.26, and final image in debian:bookworm-slim with the database clients already embedded in the repository (assets/tools, about 320 MB of binaries per pg_dump, mysqldump and mariadb-dump per version). Always use a release tag, not the main:
git clone --depth 1 --branch v3.60.0 https://github.com/databasus/databasus.git
cd databasus
docker build --build-arg APP_VERSION=v3.60.0 -t registry.exemplo.com.br/databasus:v3.60.0 .
docker push registry.exemplo.com.br/databasus:v3.60.0
In my test, on a machine with an empty cache, the build took about 2 minutes and 15 seconds and produced an image of 800 MB, the same size as the official one. The APP_VERSION appears in the interface and in /api/v1/system/version. In docker-compose.yml, just replace the line image: with your tag.
Reverse proxy with nginx
server {
    listen 443 ssl http2;
    server_name backup.exemplo.com.br;

    ssl_certificate     /etc/letsencrypt/live/backup.exemplo.com.br/fullchain.pem;
    ssl_certificate_key /etc/letsencrypt/live/backup.exemplo.com.br/privkey.pem;

    client_max_body_size 0;

    location / {
        proxy_pass http://127.0.0.1:4005;
        proxy_set_header Host $host;
        proxy_set_header X-Forwarded-For $proxy_add_x_forwarded_for;
        proxy_set_header X-Forwarded-Proto $scheme;
    }
}
Open https://backup.exemplo.com.br and create the first account: she becomes the administrator of the instance, so do that right after bringing it up, before anyone else reaches the screen.
MariaDB and MySQL backup step by step
1. Read-only user
Databasus works by default with a read-only user and checks privileges before running. From the code, SELECT and SHOW VIEW are required; without TRIGGER and EVENT the backup does not fail, but leaves triggers and events out. So grant all four:
CREATE USER 'databasus'@'10.0.0.50' IDENTIFIED BY 'troque-esta-senha';
GRANT SELECT, SHOW VIEW, TRIGGER, EVENT ON wordpress.* TO 'databasus'@'10.0.0.50';
FLUSH PRIVILEGES;
Replace 10.0.0.50 by the Databasus server IP and wordpress by your schema. If MariaDB listens only on 127.0.0.1, do not open port 3306: use the built-in SSH tunnel.
2. Register the database
- New Database → choose MySQL or MariaDB;
- host, port, user, password and database (or SSH tunnel and TLS);
- schedule: for example daily at 03:00, outside peak hours;
- storage: local disk, S3 (AWS, MinIO, Backblaze B2), Cloudflare R2, Google Drive, Dropbox, SFTP, FTP or any rclone destination;
- retention: GFS is the sensible default, for example 7 daily, 4 weekly, 12 monthly;
- notification: Telegram, Slack, Discord, Teams, Mattermost, email or webhook.
When saving, it validates the connection and privileges, detects the server version on its own and already points out if any grant is missing. Two details I noticed in the test: when turning on backups, it triggers the first backup right away, so check beforehand if the Encryption option is set to Encrypted (that's the interface default for logical backup). Without encryption, the file in storage is .zst readable by anyone with access to the bucket.
A good tip from the project's FAQ: if you have a replica, point the backup to it. The --single-transaction does not stop replication and takes the load off the primary.
3. Restore
The dump is a mysqldump standard, compressed with zstd. Download the backup through the interface (it comes out already decrypted, as .sql.zst) and restore it in any MySQL/MariaDB, on another version or another provider. The interface shows the exact command for each backup; the format is this:
zstd -dc wp-lab_backup_2026-09-24_10-23-28.sql.zst | mariadb -h 127.0.0.1 -u root -p wordpress_restoreDo this at least once, on a test database, before you actually need it. It's the only way to know how long the restore really takes.
PostgreSQL: physical, incremental, and PITR
Here Databasus goes well beyond the dump. Starting with PostgreSQL 17, which brought native incremental backup at the block level (developed by Robert Haas, with help from David Steele, author of pgBackRest), it does:
- full with
pg_basebackup, transmitted straight to Databasus; - incremental with
pg_basebackup --incremental: the server, withsummarize_wal = on, knows which blocks changed and only those are transferred; - WAL streaming continuous with
pg_receivewal, which closes the chain between one backup and another.
On restore, the pg_combinebackup joins the full with the incrementals in a data directory and PostgreSQL replays the WAL up to the point in time you choose. It's real PITR, with RPO near zero. All through the replication protocol, remote, with nothing to install on the database server.
On the PostgreSQL server, enable WAL summarization and allow replication for the backup user:
sudo -u postgres psql -c "ALTER SYSTEM SET summarize_wal = on;"
sudo -u postgres psql -c "SELECT pg_reload_conf();"
sudo -u postgres psql -c "CREATE ROLE databasus WITH LOGIN REPLICATION PASSWORD 'troque-esta-senha';"
# pg_hba.conf: host replication databasus 10.0.0.50/32 scram-sha-256
In versions 14 through 16, only logical backup with pg_dump is available.
A historical note: older versions used a backup agent installed on the database host. The project admits in the FAQ that it was a mistake (long RTO, two things to configure, doesn't run on RDS) and removed it. Anyone who still has backups of that kind can stay on v3.42.0, the last one that supports them; the upgrade warns before touching them. The reasoning is in the ADR-0009.
Restore verification: the backup really tested
A backup that finished without error is not a backup that restores. Checksum catches bit rot in the file, but it does not tell you whether the dump is complete. The exit code says the command ran, but it does not catch a user without permission on an object, a missing extension, or a different tablespace — cases where objects silently disappear from the dump.
A restore verification solves this by actually restoring. A verification agent, a small Go binary that runs on a machine of yours with Docker:
- picks up the most recent backup from Databasus's queue (outbound HTTPS connection, nothing needs to be opened inbound);
- brings up a disposable database container on the same major version;
- runs the restore with the native tool and checks the restored size;
- counts the rows of each table;
- tears down the container and sends the report.
Current limit: in the agent code, restore is only implemented for PostgreSQL (pg_restore, with the Docker image only for Postgres). For MySQL and MariaDB, the restore test remains manual, as in the previous section.
Starting up the agent
In Settings → Verification agents → Create verification agent, give it a name (verificador-01) and copy the token, which only appears once. On the verification machine:
curl -L -o verification-agent \
  "https://backup.exemplo.com.br/api/v1/system/verification-agent?arch=amd64" \
  && chmod +x verification-agent

./verification-agent start \
  --databasus-host=https://backup.exemplo.com.br \
  --agent-id=<AGENT_ID> \
  --token=<TOKEN> \
  --max-cpu=2 \
  --max-ram-mb=2048 \
  --max-disk-gb=20 \
  --max-concurrent-jobs=1
Replace amd64 by arm64 on ARM. The --max-* are total budgets, divided among simultaneous jobs, with a floor of 1 CPU and 512 MB per job. The disk is what goes wrong most often: each job needs the size of the backup, plus the size of the restored database, plus a buffer of up to 5 GB. Databasus must be on https://; plain HTTP only with --allow-insecure-http, for the lab.
The start becomes a daemon and writes the flags to databasus-verification.json. To run under systemd, use run, which stays in the foreground and reads the same saved flags. Make the first start inside /opt/databasus-agent, so the JSON stays there:
# /etc/systemd/system/databasus-verification.service
[Unit]
Description=Databasus verification agent
After=docker.service network-online.target
Requires=docker.service

[Service]
WorkingDirectory=/opt/databasus-agent
ExecStart=/opt/databasus-agent/verification-agent run
Restart=on-failure

[Install]
WantedBy=multi-user.target
cd /opt/databasus-agent
./verification-agent stop # para o daemon criado pelo start
sudo systemctl daemon-reload
sudo systemctl enable --now databasus-verification
./verification-agent statusIf systemd is still unfamiliar territory, the dedicated post helps.
Scheduling
In each database's settings, enable Scheduled verification and choose:
- After backup: every successful backup is verified immediately after. The strongest guarantee. If a new backup arrives before the previous verification finishes, the pending one is canceled and only the most recent one stays in the queue;
- hourly, daily, weekly, monthly with a time;
- cron in UTC, for example
0 4 * * 0(Sundays at 04:00 UTC).
Success and failure notifications are independent. Turn on only the failure one to avoid noise. Each check shows a timeline, exit code, restored size, number of schemas and tables, and the row count per table.
I tested it in the lab
Before writing, I brought up v3.60.0 in local containers: the official image and the one compiled from Dockerfile, pointing to a MariaDB 11.8 and a MySQL 8.4 with a table, view, trigger, and event, using the user with only SELECT, SHOW VIEW, TRIGGER, EVENT. The result:
- the server version was detected automatically and the privileges were recorded as
EVENT,SELECT,SHOW VIEW,TRIGGER; - MariaDB and MySQL backups completed in less than a second, with status
COMPLETED; - on local storage, the encrypted backup is an opaque blob, accompanied by a
.metadatawith salt and IV; without encryption, it is a.zstwith the readable SQL; - the download through the interface already comes decrypted (
.sql.zst); restored withzstd -dcin a new database, the lines came back, the view, the trigger in MariaDB, and the event in MySQL; - the image built locally behaved the same as the official one.
Security
- AES-256-GCM in the backup files and in the stored secrets (passwords, tokens, connection strings), which don't appear even in error messages;
- “zero trust” storage”: the bucket only receives encrypted files, so an S3 leak doesn't hand over your data;
- read-only user by default;
- workspaces with viewer, member, admin, and owner roles, and audit log, exportable via OpenTelemetry;
- 2FA by code sent via email on password login; login with Google or GitHub is also accepted.
On the code side, the pipeline runs CodeQL, gitleaks, semgrep, Dependabot, Trivy on the image and on the Dockerfile, and every PR runs full backup and restore cycles against real containers of all supported versions. The README is also upfront about AI: the project joined the Claude for Open Source and Codex for Open Source programs in March 2026, uses AI for review and bug hunting and rejects “vibe coded” PRs.
Don't forget to back up the database itself
It may seem obvious, but this is the point that brings the whole strategy down. In /opt/databasus/databasus-data/ (or wherever you mounted the volume):
secret.key: required. With just it you can already restore the backups without Databasus;pgdata/: configurations, schedules, and history, needed to rebuild the interface;backups/: if you use local storage.
cd /opt/databasus
docker compose stop
tar czf /root/databasus-data-$(date +%F).tar.gz databasus-data/
docker compose start
Store the secret.key in a password vault, such as Vaultwarden, outside the server. To migrate to a new machine, just recreate the folder databasus-data with these files and bring up the container. If the admin password is lost:
docker exec -it databasus ./main --list-admins
docker exec -it databasus ./main --new-password="NovaSenhaForte123" --email="admin@exemplo.com.br"
When to use it, when not to use it
Worth it if you have several small and medium databases scattered around (WordPress, GLPI, Zabbix, internal systems) that today depend on cron scripts that nobody monitors. Databasus replaces that with a screen that includes scheduling, retention, encryption, alerts, and history, and on PostgreSQL it also delivers automatically tested restores and, starting from 17, PITR.
Does not replace o mariabackup/XtraBackup with binlog on large MySQL/MariaDB, nor when the RPO needs to be in seconds for those databases. It is also not a file backup tool: for directories and volumes, keep using restic, borg, or similar. And, like any backup component, monitor Databasus itself: the container's healthcheck easily plugs into Uptime Kuma or into Gatus.
The summary: a backup that has never been restored is hope, not a backup. Databasus doesn't solve everything, but it makes tested restores cheap enough to become routine.
Links: GitHub · installation · MySQL and MariaDB · restore verification · FAQ · security