

Putting a site online with HTTPS used to be a three-ingredient recipe: a web server, certbot, and a cron job to renew the certificate — plus a fifty-line nginx.conf to tie it all together. Caddy Caddy solves all that in a single piece: you write the domain name in the configuration file and it issues the certificate, renews it automatically, and redirects HTTP to HTTPS. This guide installs Caddy on Ubuntu and Debian from the official repository, configures a static site, reverse proxy with load balancing, and PHP, and shows where the certificates, logs, and administration API live.
What is Caddy
Caddy is a web server and reverse proxy written in Go, distributed as a single binary and licensed under Apache 2.0. Matt Holt started writing it in 2014, while still in college; the first public version (0.5.0) came out in April 2015, and the 2.x line, rewritten from scratch, arrived in May 2020. The current stable version is the 2.11.7, from 3 October 2026.
Three features set it apart from nginx and Apache:
- Automatic HTTPS by default. Every site with a public domain name gets a certificate from an ACME CA (Let's Encrypt or ZeroSSL) and automatic renewal. Local names, like
localhost, receive certificates from Caddy's own internal CA. - Modern protocols enabled out of the box. HTTP/2 and, since 2.6 (September 2022), HTTP/3. The 2.10, in April 2025, added post-quantum key exchange (
x25519mlkem768) by default and support for Encrypted ClientHello (ECH). - API-based configuration. The native format is JSON, loaded and changed live by a REST API in
localhost:2019. The Caddyfile, which we will use here, is a more readable adapter that turns into this JSON.
What it doesn't do: it doesn't have nginx's dynamic module ecosystem or Apache's .htaccess either. Plugins are compiled into the binary — we'll see how at the end.
Installing from the official repository
The project maintains packages for Debian, Ubuntu, and Raspberry Pi OS in a repository hosted on Cloudsmith. The commands below are from the official documentation; I tested them on a clean Debian 13 and the package installed 2.11.7:
sudo apt install -y debian-keyring debian-archive-keyring apt-transport-https curl
curl -1sLf 'https://dl.cloudsmith.io/public/caddy/stable/gpg.key' \
  | sudo gpg --dearmor -o /usr/share/keyrings/caddy-stable-archive-keyring.gpg
curl -1sLf 'https://dl.cloudsmith.io/public/caddy/stable/debian.deb.txt' \
  | sudo tee /etc/apt/sources.list.d/caddy-stable.list
sudo chmod o+r /usr/share/keyrings/caddy-stable-archive-keyring.gpg
sudo chmod o+r /etc/apt/sources.list.d/caddy-stable.list
sudo apt update
sudo apt install caddy
If the system doesn't have the gpg, install it first using sudo apt install -y gpg. The package does quite a bit on its own:
- creates the system user
caddy, with$HOMEin/var/lib/caddyand member of the groupwww-data; - installs and already starts the service
caddy.service, which reads/etc/caddy/Caddyfile; - also installs
caddy-api.service, disabled, for those who prefer configuring only via the API; - leaves a sample Caddyfile serving
/usr/share/caddyon port 80.
caddy version
systemctl status caddy --no-pager
curl -I http://localhost
Open the ports in the firewall. HTTP/3 runs over UDP, so 443 needs to be open on both protocols:
sudo ufw allow 80/tcp
sudo ufw allow 443/tcp
sudo ufw allow 443/udp
First site with automatic HTTPS
Before editing the Caddyfile, check the public certificate prerequisites: the domain's A/AAAA record pointing to the server, and ports 80 and 443 reachable from the internet. Without these the CA can't validate the domain — and, if you get it wrong too many times, you'll hit its request rate limit.
Replace the content of /etc/caddy/Caddyfile:
{
	email admin@exemplo.com.br
}

www.exemplo.com.br {
	root * /var/www/exemplo
	file_server
	encode zstd gzip
}

exemplo.com.br {
	redir https://www.exemplo.com.br{uri} permanent
}
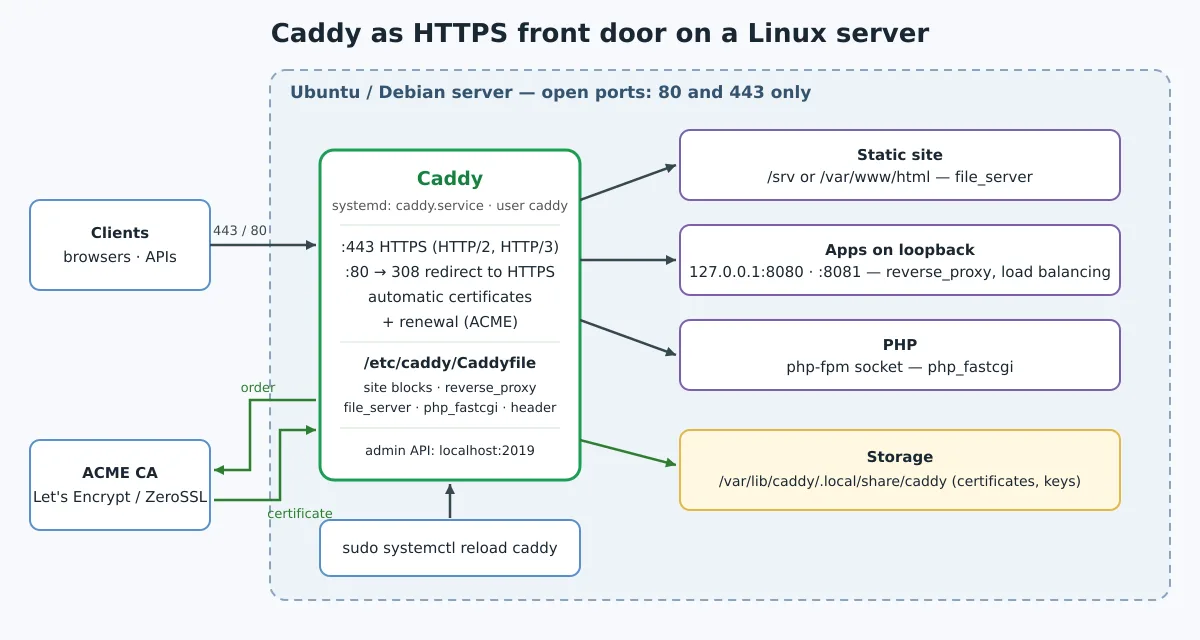
The unnamed block at the top holds the global options; the email identifies the ACME account with the CA, which can use it to send notices about the account. Each following block is a site, identified by the address. There's no port, certificate path, or HTTP redirect block: when it sees a domain name, Caddy assumes 443, obtains the certificate, and responds on port 80 with a redirect 308 to HTTPS.
sudo mkdir -p /var/www/exemplo
echo '<h1>Olá do Caddy</h1>' | sudo tee /var/www/exemplo/index.html

sudo caddy fmt --overwrite /etc/caddy/Caddyfile
sudo caddy validate --config /etc/caddy/Caddyfile
sudo systemctl reload caddy
journalctl -u caddy --no-pager -n 30
The fmt standardizes indentation (the Caddyfile uses tabs), the validate loads the configuration without applying it, and the reload swaps the configuration without restarting the process or dropping common HTTP connections (open WebSockets are closed by default; the option stream_close_delay of the reverse_proxy delays that closing). Don't use restart neither stop to change configuration: the documentation itself warns that stopping the service causes downtime. The log shows the certificate being obtained; from then on, renewal is automatic.
Reverse proxy with load balancing
The most common use of Caddy is to sit in front of applications that only listen on loopback — a Gitea, a Vaultwarden, a Node or Go API. One line is enough:
app.exemplo.com.br {
	reverse_proxy 127.0.0.1:3000
}
Caddy already forwards X-Forwarded-For, X-Forwarded-Proto and X-Forwarded-Host, and handles WebSocket with no extra configuration. With more than one instance, list the destinations and choose the policy:
(seguranca) {
	header {
		Strict-Transport-Security "max-age=31536000"
		X-Content-Type-Options nosniff
		Referrer-Policy strict-origin-when-cross-origin
		-Server
	}
}

app.exemplo.com.br {
	reverse_proxy 127.0.0.1:8080 127.0.0.1:8081 {
		lb_policy round_robin
		health_uri /healthz
		health_interval 10s
	}
	import seguranca
	log {
		output file /var/log/caddy/app.log
	}
}
The block in parentheses is a snippet: a reusable piece that goes into any site with import. The -Server removes the header that identifies the server. Active health checking (health_uri) takes the instance that stops responding out of the rotation. The log is output in JSON, one line per request.
I tested exactly this configuration with two backends: the requests alternated between them, the three security headers reached the client, the Server header disappeared, and HTTP responded 308 to HTTPS. To validate locally, without a public domain, replace the name with app.localhost: Caddy issues the certificate through the internal CA (Caddy Local Authority), and the curl -k accepts.
If you're coming from nginx, compare it with the Gogs proxy block: they are two server, four proxy_set_header and a separate certbot to do what this file does.
PHP with php-fpm
For WordPress, Nextcloud or any PHP application, the php_fastcgi directive already brings the rewrite rules for index.php. Adjust the socket path to the installed version (8.4 on Debian 13, 8.3 on Ubuntu 24.04):
blog.exemplo.com.br {
	root * /var/www/blog
	php_fastcgi unix//run/php/php8.4-fpm.sock
	file_server
	encode zstd gzip
}
The user caddy is already in the group www-data, the same as php-fpm on Debian and Ubuntu. If you use several PHP versions side by side, the pool and socket logic of post Nginx and various PHP versions is the same — only the line of the php_fastcgi.
Where certificates, logs and configuration live
| Item | Path (Debian/Ubuntu package) |
|---|---|
| Configuration | /etc/caddy/Caddyfile |
| Certificates, keys, ACME account | /var/lib/caddy/.local/share/caddy |
Local CA (sites .localhost) |
/var/lib/caddy/.local/share/caddy/pki/authorities/local/root.crt |
| Last saved JSON configuration | /var/lib/caddy/.config/caddy |
| Service logs | journalctl -u caddy |
| Access logs | where the directive log to send (in the example, /var/log/caddy/) |
The data directory needs to be persistent and included in the backup: losing /var/lib/caddy means reissuing all certificates, which, with many domains, can bump into the CA's limit. For secret variables — a DNS API token, for example —, use a systemd drop-in instead of writing it in the Caddyfile:
sudo systemctl edit caddy
# no editor:
# [Service]
# EnvironmentFile=/etc/caddy/.env
Inside the Caddyfile, the variable enters as {env.NOME}. The management of units and drop-ins is detailed in Mastering systemd.
The administration API
By default, Caddy opens a REST API at localhost:2019, accessible only from the machine itself. It is through it that the systemctl reload caddy (which calls caddy reload) delivers the new configuration. You can also query it:
curl -s localhost:2019/config/ | jq .
caddy adapt --config /etc/caddy/Caddyfile --pretty | less
The first command shows the running JSON configuration; the second, the JSON that the Caddyfile generates — useful for understanding what each directive does under the hood. Do not expose port 2019 on the network: whoever reaches it changes the server's configuration. If you run untrusted code on the same machine, the documentation recommends isolating processes or changing the API address to a Unix socket with restricted permissions.
Docker
The official image is caddy on Docker Hub. On 5 October 2026 it was still on 2.11.6 — two days ahead of the apt package —, so use the series tag 2.11:
docker run -d --name caddy --restart unless-stopped \
  -p 80:80 -p 443:443 -p 443:443/udp \
  -v $PWD/Caddyfile:/etc/caddy/Caddyfile:ro \
  -v caddy_data:/data \
  -v caddy_config:/config \
  caddy:2.11
The volume /data is the equivalent of /var/lib/caddy: without it, each container recreation requests new certificates. The publication 443:443/udp is what enables HTTP/3. For the basics of containers, see the Docker course.
Plugins: xcaddy and add-package
The official package only includes the standard modules. Plugins — DNS providers for certificates wildcard, authentication, rate limit — are compiled into the binary. The recommended way is xcaddy, which requires Go to be installed:
go install github.com/caddyserver/xcaddy/cmd/xcaddy@latest
xcaddy build --with github.com/caddy-dns/cloudflare
The result is a binary ./caddy in the current directory. To use it with the package's service, follow the custom builds section of the documentation, which uses dpkg-divert to prevent apt from overwriting it on the next update. There is also the caddy add-package, which downloads a binary with the ready-made plugin from the project's build server, but it is still marked as experimental.
Caddy or nginx?
Caddy wins when the problem is putting services behind HTTPS with little friction: a VPS with half a dozen applications, a homelab, test environments, or teams that do not want to deal with certbot and renewal. Nginx remains strong where it is already installed and tuned, in very specific cache and rewrite configurations, and where the team is fluent in its syntax. Nothing prevents using both: Caddy on the edge handling TLS and nginx behind it serving a legacy application.
If you host services such as the Vaultwarden, the Gitea or the Uptime Kuma, swap the nginx block for three lines of Caddyfile and compare.
Links
- caddyserver.com · documentation · github.com/caddyserver/caddy
- Automatic HTTPS · reverse_proxy · Running Caddy (systemd)
A single binary, a short config file, and no certbot to remember to renew: that's Caddy's pitch, and it holds up. Install it from the official repository, keep /var/lib/caddy no backup, leave the API on localhost and use reload, never restart, to apply changes.